Does your cat or kitten love to play? Check out our 6 easy steps for a DIY scratching post that your cat is sure to love. It’s a great toy for your cat and encourages them to scratch something other than your furniture! Included is a video tutorial and easy step-by-step instructions on how to make one for your home.
DIY Cat Scratching Post
Inspired From:
You Will Need...
- 2 Square Wood Boards – 18’ x 18’
- 4×4 Wood Post
- Sisal Rope
- Decorative Burlap
- Superior Rug Pad Scrap
- Super Hold Rug Pad Scrap
- Screws and Drill
- Ruler/ Measuring Tape
- Staple Gun
- Scissors
- Hot Glue Gun
Step by Step Instructions
Step 1
Step One: Measure and Cut Your Supplies
For my DIY cat toy I want to use up any scrap I had leftover from previous projects. We had a plywood board around the house, that we cut in half and made two square platforms. For the support, we used a wood post that was 4″x4″x2′ because I had it lying around. If you live in a smaller apartment or home, I suggest using a shorter post. Once you measure and cut your post and platforms, it is time to measure the rug pad. We measured three pieces of our Superior rug pad to be the same size as my platforms. Next, we measured one Super Hold rug pad to fit on the bottom of my base platform. The Super Hold acts as a non-slip surface for the cat toy so your toy will not move around no matter how much your cat plays with it. The Superior rug pad acts as an excellent scratching surface for your cat and is comfortable enough for your cat to lounge on.

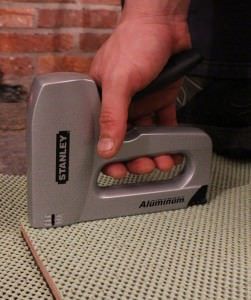
Step 2
Step Two: Secure Rug Pad
Once you have measured out all your rug pads it is time to attach the rug pad to your platforms. Using a staple gun, secure the rug pads to both sides of each platform. Remember to use the one side that has the Super Hold rug pad for the base of your cat toy. We put staples all along the edges of the platform to ensure the rug pad stayed in place.
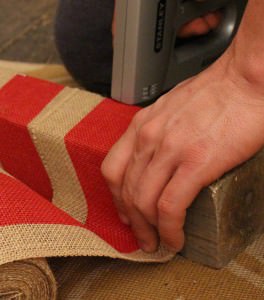
Step 3
Step Four: Wrap and Secure the Burlap to the Post
Now that you have both your bases ready, it is time to move on your post! I had leftover burlap ribbon in my home from a previous craft project, so I simply used that burlap and wrapped it around the entire length of the post. If you don’t have burlap ribbon handy you can use sisal rope, more rug pad scrap, burlap scrap, or any other rough fabric that your cat will love to scratch at! We simply wrapped the fabric around the post and stapled as we went. For the post, we tried to use less staples than the platforms because I did not want my cat’s claws getting caught while he played. So far, I have not noticed any problems and the burlap has stayed in place.
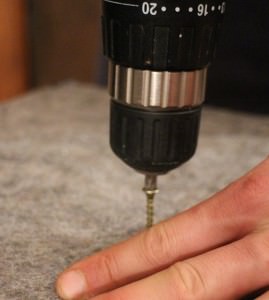
Step 4
Step Five: Attach the Post to the Platforms
One your complete your post it is time to attach the post to the platforms. Measure your base platform first and find the center. Place the post in the center of the base and flip it over to screw in from the bottom. Your post should be on the side with the superior rug pad and the green Super Hold rug pad should be facing up. Using construction screws and a drill, secure the post to the base. We started off by using shorter screws but ended up having to switch to construction screws to secure the post in place. Once the post has been screwed into the base, repeat the process for the top platform.


Leave a Reply