Looking for an easy DIY sewing project? This gorgeous knit maxi dress tutorial is just the ticket. This easy project can be completed in under an hour and is a perfect dress for beginners!
Sew DIY Knit Maxi Dress Tutorial
| Difficulty | Cost | Time | Age | Person | Event |
|---|---|---|---|---|---|
|
Easy
|
$1 to $25
|
30 Minutes
|
-- | -- | -- |
Inspired From:
You Will Need...
- 2 yards of Knit Fabric
- Corresponding Thread
- Sewing Machine
Step by Step Instructions
Step 1
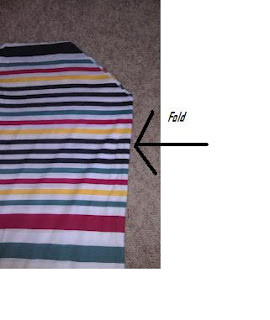
First you are going to lay out your fabric and fold it in half. Knit fabric is usually 60 inches wide so when you fold the material in half, it should measure 30 inches wide. Measure how tall you are are from the top of your shoulders to the floor (if that’s how long you’d like the dress) and then cut off any remaining length. Then cut your fabric at the fold so that you have two identical pieces that are 30 inches wide.

Step 2
Next I cut out the neck area by folding the fabric in half again and making a 45 degree cut as seen in the picture below. Once the two pieces of fabric are unfolded you will have two identical V’s in the center of each piece.
Step 3
Next, I placed the two pieces front to front and sewed a straight line up the sides. I stopped a few inches down from the top, leaving enough room for my arms.
Finally, I sewed two straight lines across the top of the dress, on either side of the “V”. I used as wide of a stitch as I could and made sure to leave plenty of thread tails on either end. The picture below shows the area where you would sew these straight lines at the top (keep in mind that in this picture the material is still folded in half, you will be sewing the two pieces of material together after it is unfolded, but I wanted to give you some kind of visual as to what I’m referring to)

Step 4
Next I pulled the back stitch slowly (this is the thread tail that you left when sewing the lines on the top of the dress, the one in the back) so that the material “scrunched” or “ruffled” together. It is important to go slowly. Once I got it scrunched up the way that I wanted I knotted the thread on both ends. This is why its important to leave long thread tails after sewing.
Finally I cut a thin strip of material to use as the tie and I was done. Since its knit it looked fine without doing any more hemming. I love love love the way it turned out and it is SO comfortable! I want to make six more so I can wear a different one every week!

Gallery


Leave a Reply