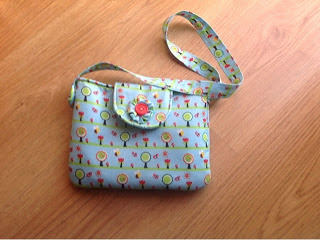
Tutorial and pattern (drafted by me) that will allow you to put together a super cute bag for your little girls or to give as a gift
Little girl bag: tutorial and pattern
Inspired From:
You Will Need...
- exterior fabric
- lining fabric
- batting
- one snap
- buttons to embellish (optional)
- bias tape maker (optional)
- thread, needles and general sewing supplies
Step by Step Instructions
Step 1
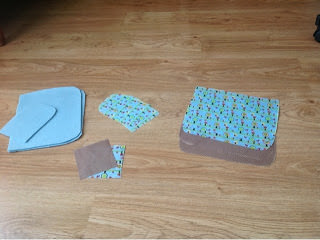
Download the pattern and cut all pattern pieces.
You with need to cut six bag pieces, two from the outside fabric, two from the lining and two from batting. If your exterior fabric has a pattern, try to cut both pieces in a way that the pattern matches on both sides once you sew the front to the back.
For the flap you will need to cut three pieces, one from batting and two from your exterior fabric. If you decide to add an inside pocket (marked as optional on the pattern), cut two pieces, one from the outside fabric and one from lining. If you’re very picky, you will also try to cut the flap pieces in a way that allows you to match the pattern of the fabric once the flap is attached to the bag.
Step 2
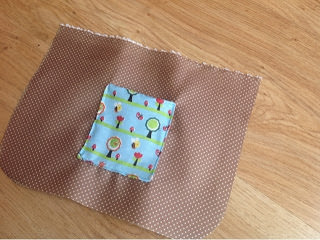
Pocket (optional). If you do not want to add a pocket, skip this step and go directly to step 3. If you decided to make a pocket, that is the first thing you will have to sew. Pin fabrics right sides together and sew around the edges, leaving an opening at the bottom.
Trim excess fabric, clip corners and turn inside out through the bottom opening.
Pin the pocket to one of your lining pieces, making sure it is centered.
Sew around the sides and the bottom, taking care to close the initial opening.
Step 3
body of the bag.
Start by pinning the two lining pieces right sides together. Sew around the sides and part of the bottom, again leaving and opening. Don’t sew the top.
Next, do the same with the exterior fabric. Pin right sides together and then lay the batting on each side. Sew around the sides and bottom. This time you do not need to leave an opening. Again, don’t sew the top.Trim excess and turn inside out.
Insert the outside piece into the lining, matching both fabrics right sides together and sew around the top. Pull the outside piece though the bottom opening of the lining.Hand sew the bottom opening shut and tuck lining back inside the bag.

Step 4
Now the flap.
Pin flap pieces right sides together, with the batting piece pinned to what will be the outside of your flap (trust me, it does make a difference. If you pin it to the other side, the seams will show through the fabric and your flap will be sporting visible bumps).
Sew around the sides and the bottom. Turn inside out and press it flat. Fold each of the top edges and tuck it into the flap. Top stitch.
Step 5
Finishing the bag.
Pin around the edge of the bag making sure the the lining falls strait on the inside. Pin the flap as well, making sure it is centered.
Top stitch around the top.
Step 6
The strap: I used a bias tape maker you can make the strap the way you feel most confident about. Attach the strap to the sides of the bag.

Step 7
In order to keep the flap closed, sew or attach a snap in place.

Step 8
Embellish (optional).
I added yo-yos and buttons in front of the flap and on each side (this can be useful if the seams attaching the strap are not very pretty and you need to hide them out).

Leave a Reply