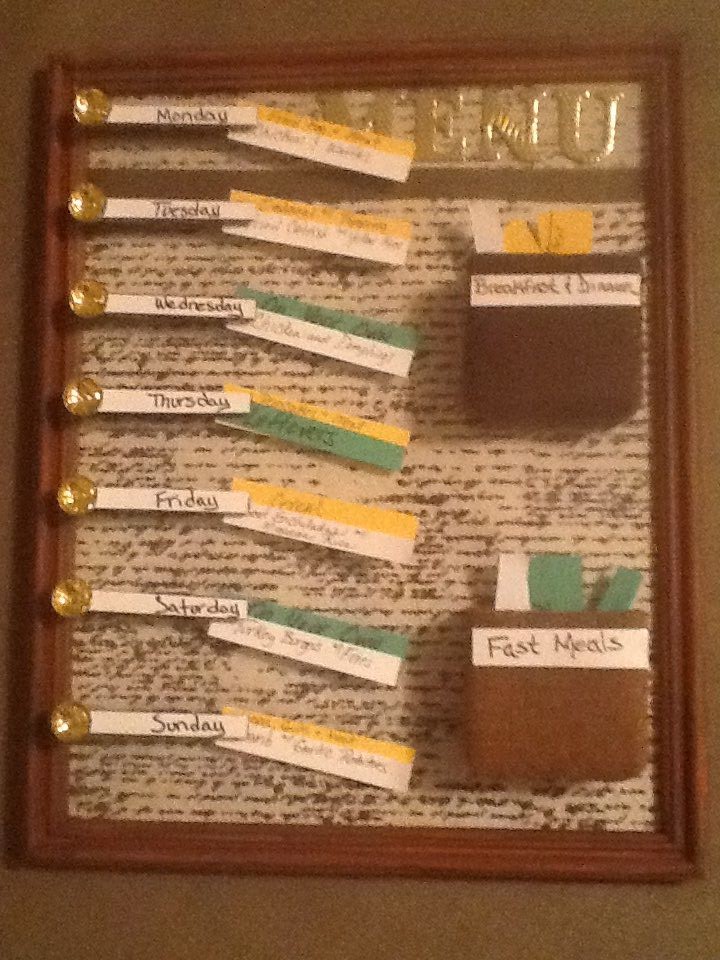
This is a neat way to display your weekly menu. There are a few ways that you can create a menu board. My advice would be to jot down those things that are not only practical but needed for your family situation. For my family, it was essential that we were able to display our breakfast in addition to dinner. It serves as a constant reminder for us to make sure we eat breakfast daily. We are always on-the-go so we needed a category for “fast meals” for those evenings that we get home late. Breakfast is color coded yellow while dinner is white. I also added categories in green for Leftovers (we tend to make dishes that last a day or two), Carry-out (this helps in planning and budgeting those family nights out) and O.Y.O. (On Your Own) which means that everyone can choose something to eat for the evening.
Menu Board DIY
Inspired From:
You Will Need...
- 11x14 photo frame (this was an old one that I refinished the frame)
- 2 12x12 scrapbook paper for the background
- Letters
- 7 clothespins
- Card stock in colors of choice
- Glue sticks
- Glue gun
- 7 jeweled accents
- Transparent tape
- 2 crayon boxes
- 2 small felt pieces
Step by Step Instructions
Step 1
Setting up Photo Frame
Glue the scrapbook paper to the back of the photo frame. Use a strip of another sheet to cover the seam of the paper. Add the lettering to the background and put the finished product back inside frame. Make sure you push the backing in close to the glass so it looks neat.
Step 2
Creating the Menu Clips
Stain or paint the clothespins to the color you desire (I used Brown Oxide Apple Barrel Paint). Cut slips of card stock to fit the clothespin. Write the days of the week on each slip. I wrote mine closer to the end of the clothespin to accommodate the jewels. Place the card stock slip on top of the clothespin. Then, place a piece of clear tape over the card stock sealing it neatly on top of the clothespin. Hot glue the jeweled embellishment to the end of the clothespin.
Step 3
Making Menu Holder
Cut two crayon boxes down to desired height. Cover with felt and hot glue to box. Cut a slip of card stock, write the desired category on the slip and cover with clear tape. Hot glue the finished slip onto the boxes.
Step 4
Create Menu Selection Slips
Cut card stock slips. For mine, I made the breakfast slips slightly wider than dinner so both meals could be seen clearly. Write your meals on each slip.
Step 5
Putting It Together
Position the finished clothespins on the glass in desired spot, then hot glue them to the glass. Position the meal selection boxes on the glass in desired spot, then hot glue to the glass. Put meal selection slips in the designated boxes and hang up your new menu board.
Gallery


Leave a Reply