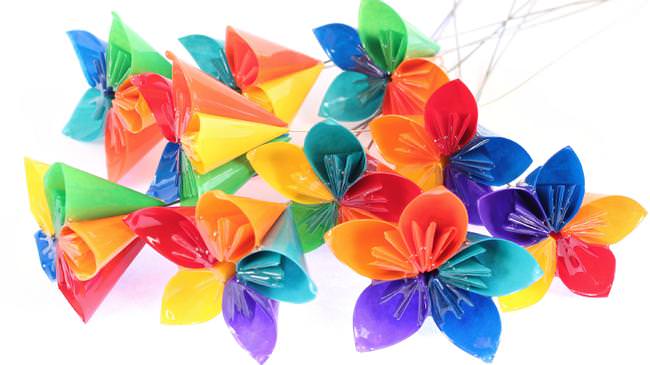
Make your paper flowers last forever with this easy technique. Perfect way to preserver your DIY paper flower wedding bouquet! Watch the video tutorial here: https://www.youtube.com/watch?v=khiuuiaaqw8
Resin Flowers
| Difficulty | Cost | Time | Age | Person | Event |
|---|---|---|---|---|---|
|
Moderate
|
$25 to $50
|
Full Day
|
-- | -- | -- |
Inspired From:
You Will Need...
- Glaze Coat Epoxy Resin
- 18 gage wire
- Wire cutters
- 3 1/2" x 3 1/2" colored office paper
- Clothespins
- Hot glue gun
- White school glue
- Yarn or twine
Step by Step Instructions
Step 1
1. Fold the square in half on the diagonal to form a triangle
2. Fold the left and right corners up to meet the top point and form a square
3. Fold the front points out so each outer edge lines up with the edge of the square
4. Unfold the last fold then open each side up into a pocket and flatten each pocket out along the crease lines you just made, to form a kite shape
5. Fold the tip of each kite shape forward along the line of the edge of the paper to form a triangle
6. Fold the lower edge of each side up along the existing crease
7. Add a thin layer of glue along one of the front flaps
8. Use a clothespin to hold them together until the glue dries
9. Continue making 5 petals for each flower
Step 2
10. Glue groups of 2 and 3 together and let dry
11. Glue the sets of 2 and 3 together to create a complete flower
12. Add hot glue to the end of a 12″ piece of wire
13. Insert the wire into the center of the flower to create a stem
14. Mix the Glaze Coat in a container large enough to dip the flowers
15. Dip the flowers in the Glaze Coat and hang to dry on a mini clothesline
*Make sure you have plenty of newspaper under the clothesline to catch the dripping Glaze Coat
Gallery


Leave a Reply