Welcome to Week 3 of the Blogging 101 series! This weeks question is geared specifically towards blogs through blogger.com, so I apologize in advance to those who have blogs hosted through other websites.

This week’s question:
Q: What are Blogger pages and how do you use them?
A: I received a lot of questions about this last week and often have clients who ask about this feature as well. Blogger pages is a new feature that is actually very useful. These pages are great to include on your navigation barswhich I gave a tutorial on last week. You can see that entire tutorial here.
Today were going to start from the very beginning. 🙂 On your Blogger dashboard, click on the word Design.

From there we need to select the Posting tab.

Clicking on the Posting tab” will take you to the place where you would normally write a post. Instead of typing here, we are going to click over to the Edit Pages link.
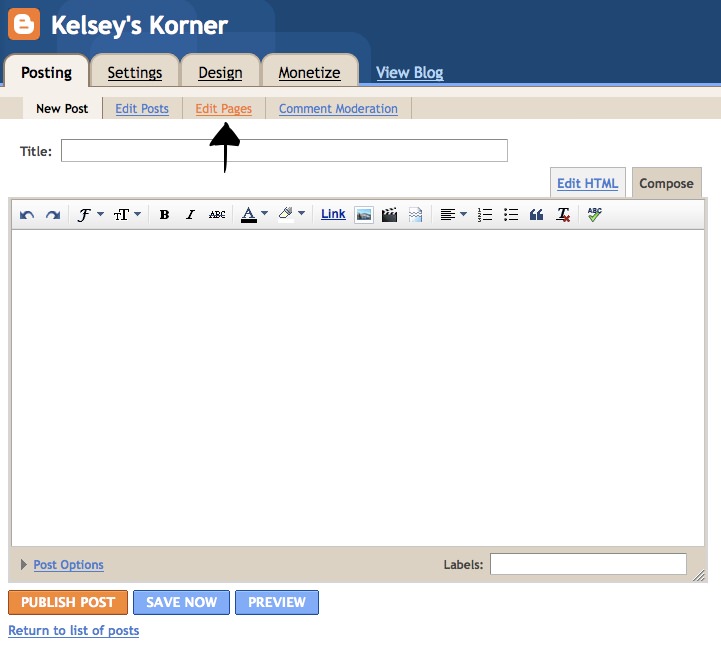
Once youre in the pages section, simply click on New Page.

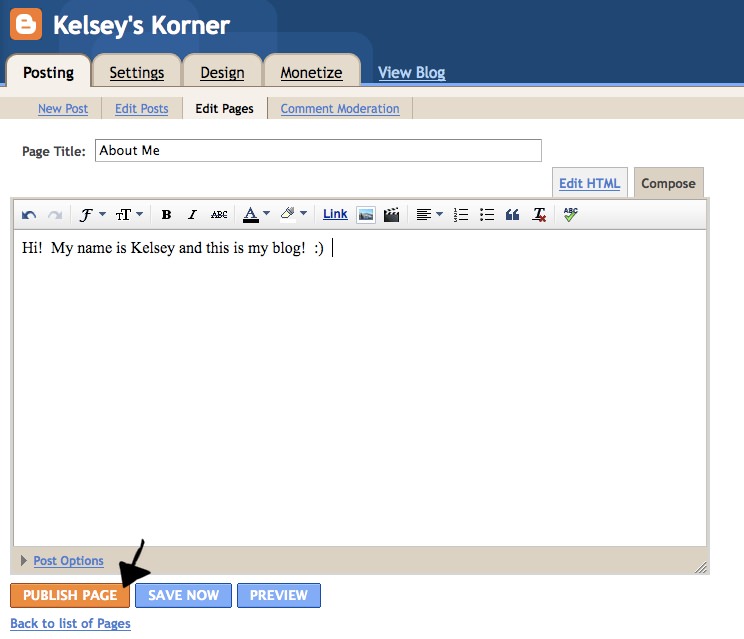
Here you will see a screen that is identical to your standard posting screen. You are now free to write what you want on your page. Simply title the page and fill in the section just as you would a post.

After youve finished filling it out, click Publish Page.
After publishing, you will come to a screen that asks you how you would like your pages to appear.

What you select depends on how you want to use your pages. If you select either Blog sidebar” or “Blog tabs your pages will automatically be placed on your blog. Heres an example of what happens if I select Blog tabs.

Now you may be wondering how this is different from the navigation bar I helped you create last week. There are two main differences. First, when Blogger adds the pages, the links are automatically left aligned. I personally prefer them to be centered. I realize that this may just be the designer in me talking. 🙂 Secondly, when Blogger adds your pages for you, you are not able to add any other links. This means that you cannot add a link to your photography business, your favorite store, or your Facebook page like you would be able to do with the navigation bar we created last week. So on that note, lets go back and take a look at what to do if you want to use these pages on your own navigation bar.
If you decide that you dont want Blogger to automatically post your links and you want to do it yourself, you need to select the No gadget option. Keep in mind that you will need to select this option each and every time that you create a new page or edit an existing one.

After selecting No gadget and publishing your page, you will see a screen that tells you that your page was published successfully. Now click on View Page.

Once you’re viewing your new page, simply highlight and copy the entire link to the page as I have shown here in purple…

Finally, go back to the code from the navigation bar tutorial and paste the link you just copied in the correct place. Thats it! You now have a couple of different options on how to use this great new Blogger feature.
Do you have another question you want answered? Leave a comment! 🙂

Hello!
I was wondering if it is possible to create a page on Blogger that is linked to an external website. For example, I have my Blogger home page and an additional page I created called, Photo Gallery. I am hoping that I can have my Photo Gallery page linked right to a SmugMug page. So when I click on the Photo Gallery link, I leave Blogger and go directly to the external site. Is this possible?
Thanks so much for your time!
Hi! Great tutorials!! I am a little stumped now though, it looks like blogger has removed the “no gadget” option. I was going to create my own header bar like in your other tutorial, but now I can’t seem to figure out how to do that. Is there any way to use “pages” to create the other locations for content but not actually publish them on the pages widget with the new changes?
ugh. I give up