After I posted this tutorial on creating a simple navigation bar, I received a lot of questions about making a fancier navigation bar with images. In order to answer this, a lot of the same steps will be used–but I will be adding in how to use images instead of just words.

This weeks question:
Q: How do you make a navigation bar with images?
A: First lets take a look at what a navigation bar (often called a menu bar) is and why its useful! A navigation bar with images looks like this:
![]()
Having important links in one place is a great way for readers to find what theyre looking for on your blog. Common links found on navigation bars include About Me pages, posts with contact information, or even links to your other blogs. So lets get started!
Step 1: Decide what links you want to include on your navigation bar. Find and copy the links to these locations. For example, I want to include the following information:
– Home: http://kreatedbykelsey.blogspot.com
– About Me: http://kreatedbykelsey.blogspot.com/p/about-me.html
– My Portfolio: http://kreatedbykelsey.blogspot.com/p/portfolio.html
Step 2: We need to create our images. To do this, well need some sort of editing program. If you dont have a purchased program such as Photoshop, there are many free options that will work great for our purposes! My personal favorite is Gimp, but you can use anything from Picnik to your basic Paint program.
How big or small you make your images is really up to you. I like to make mine somewhere between 30 pixels and 50 pixels in height. One thing to consider is how many images you plan on using. For example, if you have many links you want to add, your images will need to be a little bit smaller in order to fit. The size of your images may be something that you need to play around with!
Step 3: Once youve created images that youre happy with, save them to your computer as either .jpg, .png, or .gif files.
Step 4: Now that your images are saved, we need to upload them to the internet! I use Photobucket. If you dont have an account, follow their simple directions to create one. Once youve logged into your account, click on Upload Images and Video and find the images that you just created and saved.

Step 5: After youve uploaded your images, click on each one until you see a screen like this:
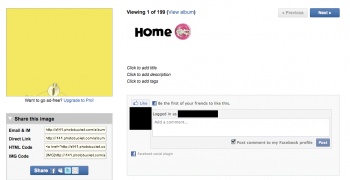 Copy the Direct Link information for each of the links you uploaded. I will refer to these links later on as the links to your images.
Step 6 : Copy the following HTML code exactly as it appears here.
<center><a href="LINK1 GOES HERE"><img src="IMAGE LINK1 GOES HERE"></a><a href="LINK2 GOES HERE"><img src="IMAGE LINK2 GOES HERE"></a><a href="LINK3 GOES HERE"><img src="IMAGE LINK3 GOES HERE"></a></center>
Step 7: Next we need to fill in the different parts of the code. Lets start with the first link. In my case this is my homepage, http://kreatedbykelsey.blogspot.com. I am going to replace the blue words LINK1 GOES HERE with this link.
Step 8: Now that Ive filled in the first link, Im going to fill in the image link. In this case, Im going to fill in the red words where it says IMAGE LINK1 GOES HERE with the link to my first image, http://i141.photobucket.com/albums/r75/kreatedbykelsey/Home.png. My HTML now looks like this:
<center><a href="http://kreatedbykelsey.blogspot.com"><img src="http://i141.photobucket.com/albums/r75/kreatedbykelsey/Home.png"></a><a href="LINK2 GOES HERE"><img src="IMAGE LINK2 GOES HERE"></a><a href="LINK3 GOES HERE"><img src="IMAGE LINK3 GOES HERE"></a></center>
Step 9: Repeat steps 7 and 8 for the rest of the links you want on your navigation bar. Depending on how many links you want on your navigation bar, were now going to have to dig a little deeper into the HTML
Step 10: The original code I gave you in Step 6 is for 3 links. However, if you want more links you will need to copy the following code for each additional link that you want to include:
<a href="NEXT LINK GOES HERE"><img src="NEXT IMAGE LINK GOES HERE"></a>
The above code needs to be placed directly after the last </a> you see in the original code. This is shown in the picture below.

Step 11: After youve inserted all of the links and images you want on your navigation bar, we need to insert it underneath your header. Go to your dashboard and click Add a Gadget.

Select HTML/JavaScript and paste your completed code into the box. Make sure to leave the gadget title blank as shown in the picture below!

Step 12: Save it to your blog! Lets take a look at what the final product looks like
![]()
Youre done! Make sure to test out your links to see if they take you to the right places. 🙂
Do you have a question you want me to answer? Leave a comment!

Thanks! I was hoping for that 🙂
Hi! You can absolutely use those links for the navigation bar. The only thing you have to do is go back in to each page and republish it. When it gives you the option of where to link it, simply select “No Gadget”. This just means that the pages still exist, but you will be linking them yourself (using a navigation bar). Hope this helps!
Awesome tutorial! Thanks so much!
Great tutorial! I was wondering….. I used the PAGES option to make a horizontal link list (navigation bar). Can I use those as my links or do I have to delete them and make my links that I want as a post instead?
Thanks!
If anyone is having trouble getting their code to work try this:
-Post your code into an HTML gadget on your blog.
-Find every quotation mark in your code and simply type over it with a NEW quotation mark.
It sounds silly, but it will work!