Got books that your child has outgrown or no longer reads? Consider giving to those in need at a shelter or local library! Today we’re learning how to make a tote with this free tote pattern. It’s a no-sew tote bag pattern that you can pack full with used books and a fun activity and boredom buster you can do with your kids.
Today marks the final installment in our Boredom Busters series. In case you’ve missed a week or two, here’s a brief recap of the ideas I’ve shared so far: We’ve enjoyed Edible Bingo, created a Photo Scavenger Hunt, and played the Magnetic Fishy Game.
On tap for today is a project that enables children to use their creativity to benefit others! With school having started in many places, and just around the corner in most others, books and reading will soon replace sunscreen and swimming as the primary focus for most children.
Sadly, there are all too many kids who lack a home library, even one containing one or two titles. To do our part, my daughter and I recently created a personalized (no-sew!) book tote and filled it with books we no longer read. By taking the bag to a local battered women’s shelter, we’ll be able to bring the joy of reading to a child staying there!
Got Books? Give To A Local Library or Shelter!

Decorating The Tote
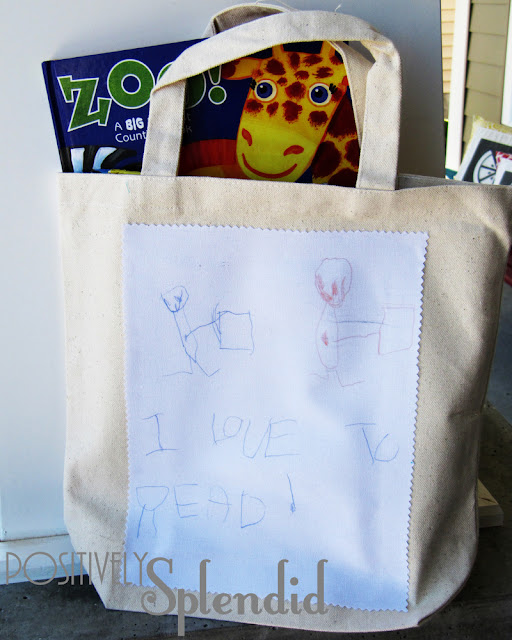
To start, ask your child to draw a picture of him- or herself enjoying a book with a friend on a regular sheet of 8.5 x 11-inch paper. Once the picture is complete, scan the artwork into your computer and save it as a jpg file. (If you don’t own a home scanner, you can take pictures to your local copy store, where they can do this for you.)
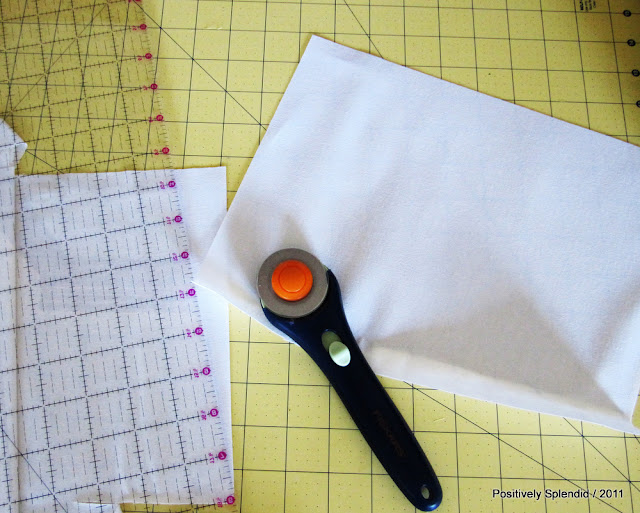
To transfer the picture onto fabric to adhere to the tote, start by cutting a piece of white canvas fabric to 8.5 x 11 inches. Cut a piece of freezer paper to the same dimensions. Using a dry iron on a cotton setting, adhere the freezer paper to the back of your canvas piece, making sure to the place the shiny side of the paper against the fabric. By backing the fabric with the freezer paper, you will now be able to feed it through your inkjet printer. Cool!


If desired, use pinking shears to trim the edges to minimize fraying.

Center the printed fabric image onto the front of a store-bought canvas tote. Adhere the image to the tote using iron-on fusible web tape. Your bag is finished!

Filling and Delivering the Tote
Take an hour or so to sort through your book collection with your kids, and explain to them that there are some children who don’t have books to read. Have them personally choose 3-4 books to place in their tote to give to a child in need.
Terrific places to consider donating the filled bags are battered women’s shelters, local schools, your church, the Salvation Army, or children’s hospitals. A nice idea when dropping off the books is to tuck a little piece of paper inside containing the address and information for your local library so the recipient can use their new tote when they go check out even more books to enjoy!

If you have any questions about this project or any other from this series, feel free to post them either in the comments here, or over on my blog.
More Sewing Patterns from Tip Junkie:
- 10 Anthropologie Inspired DIY Projects {free patterns}
- How to Sew the Perfect Pleats
- How to Make a Camera Strap Cover

Amy is mama to three small children (with another on the way!) and author of Positively Splendid, a haven of crafting and DIY inspiration, and a place where creative people of all skill levels can come and feel right at home. Because Amy likes to think of each tutorial as sitting down with friends to learn something new together, each and every project at Positively Splendid is explained to the last detail with step-by-step photo tutorials. Originally from the desert Southwest, Amy now resides outside Nashville, Tennessee.

Sounds good ! Photo to canvas prints are the best way to display our favourite photographs.