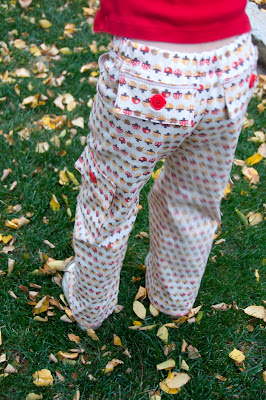
Sewing kids clothes is easier than you might think! If you’re looking for a fun sewing project with great pictured instructions, here’s how to sew cargo pants for kids.
When Fall hits I love the idea of sewing a bunch of comfy clothes for my daughters to wear and elastic waist pants are always in the mix. They are a great way to use up some of my fabric stash, such as this cute Japanese import printed cotton, and this year I decided to take them up a notch, with cargo pockets. I love the look on people of all ages, so why not my kids too?
Kids’ Cargo Pants Sewing Tutorial
Cargo pockets provide a nice opportunity to embellish an otherwise simple pant. And with ample top-stitching, especially in a nice contrasting color such as this Coats & Clark red thread, the end result is not at all home-made. Handmade yes, but professional looking.

Did I mention they are functional too? What child doesn’t need an extra pocket this time of year for stashing acorns, or toy cars, or a big handful of rocks?
Following is a simple sewing tutorial for converting any elastic waist (or flat front, elastic back) kids pants pattern to cargo pants. Read on for all the how-to (and see here for a tutorial to make these convertible cargos for warmer weather).
Materials You’ll Need:
- Your favorite pattern for elastic waist pants. (I used this free flat front pattern from MADE)
- My pattern for cargo pockets, found here.
- Enough material for all of the above (1/4 of a yard extra is plenty for the pockets)
- Coordinating thread. (I decided to use a Coats&Clark red for a bit of contrast. I recommend contrasting thread to get the most out of your top-stitching!)
- At the end of this tutorial, I’ve also included some important notes that you might want to be sure to read before you begin. * {wink}
Pattern & Getting Started
1. Cut out the pants pieces according to your pants pattern.
2. Cut out the pockets as indicated on my pattern (4 each of the square and front pockets and 8 of the pocket flaps ).
Sewing the Cargo Pockets
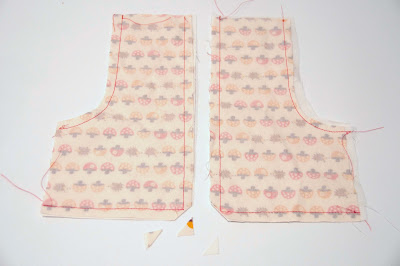
3. We’re going to sew all the pocket pieces together so no wrong sides of the fabric are exposed. Stitch the cargo pockets right sides together with a 3/8″ seam leaving a 3″ opening in the top for turning. Clip the corners. You should have two pockets.
4. Stitch the pocket flaps right sides together with a 3/8″ seam, but leave a 3″ opening in the top for turning. Clip the corners. You should have four pocket flaps.
5. Stitch the front pockets right sides together with a 3/8″ seam, leaving the top and short side open for turning. Clip the corners and trim the curved seam. You should have two pockets.
6. Turn all pieces right sides out (you can see the openings for turning in the picture below).
7. Press, being careful to fold in the openings so the edges are straight with the stitched edges. Be sure you have a mirrored set of front pockets to top stitch (the front side of the top-stitching always looks best.)
8. Top stitch the front pockets on the sides and bottom (skip the raw/open edges on the top and short side) as close to the pressed edge as possible. Top stitch the curved side again 1/8″ from the first row of top stitching. (You’ll create the rest of the top stitching when you stitch the pockets to the pants.)
9. Top stitch the cargo pockets on all sides as close to the pressed edge as possible. Top stitch the top edge again 1/8″ from the first row of top stitching. (As mentioned above, we’ll complete the second row of top stitching when we stitch the pockets onto the pants.)
10. Top stitch the pocket flaps on all sides as close to the pressed edge as possible. Top stitch the side, bottom edge and other side again 1/8″ from the first row of top stitching.
11. Next we’ll place the pockets on the pants pieces and stitch them on. If you have a pair of your child’s pants you like, use them as a guide for the pocket placement measuring form the sides and top of the inseam.
12. Pin the front pockets to the pants front aligning the raw/open edges at the top and sides with the top and side of the front pants piece. (This assumes you are using a pattern that has a self-waistband. If you are using a pattern with a separate waistband check the placement of the pockets as you may want to sew them on a bit higher and trim the top of the pockets.)
13. Baste the top and sides of the pockets to the pants. Top stitch along the side and bottom 1/8″ from the first row of stitching. The top and
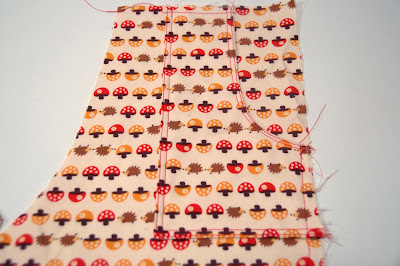
14. Following your pants pattern (and adapting it if necessary to sew the legs together first), sew the front to the back of each leg. If you would like, add two rows of top-stitching down this side seam–one in the seam and the other 1/8″ onto the back piece. I love adding the topstitching here. I think it really makes for a professional looking finish!
15. Next we’re going to sew on the cargo pockets on the side seam of the pants. We’ll sew on the pocket and then sew on the flap a bit above it, about 1/4″, so it can flip up easily. You will want these pockets to be at about knee height on your child. I placed my flaps about 2.5″ lower than the bottom of the front pocket. So the cargo pockets are about 2.75″ below the bottoms of the front pockets.
16. Pin and stitch the cargo pockets around three sides 1/8″ from the first row of stitching and leave the top open.
18. Next pin two of the pocket flaps to the back of the pants. We’re making artificial pockets here. Use an existing pair of pants as a guide taking into account extra fabric at the top for the waistband casing (about 2 1/4″). The pocket flaps should sit at least 1/2″ below the waist band when the pants are finished, but they could be a bit lower depending on your preference–no exact science here! Pin your pocket flap in place along the top of the flap and stitch 1/8″ from the first line of stitching.
19. You can stitch on the button over the buttonhole through all the layers of fabric, or lift the flap and stitch it underneath and button it “closed.”
20. Sew a button onto the top of the cargo pocket so you can button the flap closed. I poked a pin through the button hole onto the cargo pocket to position my buttons.
21. Now you can follow the rest of your pants pattern to finish the pants. You’ll need to sew each leg together along the inseam, sew the two legs together along the rise/crotch seam, hem the legs, and create the waistband casing (I folded over 1/4″: and stitched, then folded over again 1″ and threaded through 3/4″ elastic.)
* Important Notes:
* I have used this pocket pattern for pants for kids, ages 2 1/2 and 5. If you are going much younger (say 12 months) or older (7 or above) you may want to either change your seam allowances or cut the pattern smaller or larger. A good thing to do is to compare the pattern pieces to pockets on a pair of your child’s pants and see how the size looks.
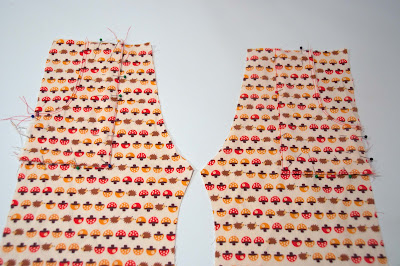
* Pull-on pants such as these are generally sewn one of two ways: either you sew each leg together and then put one inside the other and stitch the rise/crotch seam, OR you sew the front pieces together and the back pieces together along the rise and then stitch the front and back together along the side and inseams. In order to add the cargo pockets you need to use the first method–sewing the pant legs together first so you can sew on the side cargo pockets. See the photo below.
* The following tutorial shows pants with a self-waistband. If your pattern has a separate waistband you can either alter it by adding 2 1/2″ to the tops of the leg pieces, or you can add the waistband later as directed by your pattern and the front pockets will be seamed in the waistband.
* I used a lot of top stitching because I think it’s cute! you can skip some of it if you’d like but you’ll be stitching the pockets onto the pants and creating some top stitching that way, so you may want to go with that look by adding it on other seams. I did one row of top stitching as close as possible to the edges of the pockets and then I created a second row when I stitched on the pockets and put this one 1/8″ inside the first row. This creates some “flappiness” around the pockets–a little bit of margin between the edge and where the pockets are stitched down. I like the look but if you’d rather forego it you could do your first row of topstitching 1/4″ in and then the second close to the edge when you are stitching down the pockets.
* It’s a good idea to read through this entire tutorial before embarking so you can make any adjustments to the plan to fit your pants pattern and idea for the final product!

You did it! You’ve got a new pair of cargo pants for your little one to wear to school or exploring!
More Sewing Tutorials:
- 15 Doll Dress Up Clothes {free tutorials}
- 15 Great Throw Pillow Tutorials
- Understanding Parts of A Sewing Machine

*A special thanks to Coats & Clark for sponsoring and providing Anneliese with the Dual Duty XP thread to be used to make these cargo pants, and for making a great multi-purpose thread to meet our sewing needs! {wink}


I used your tutorial as the basis for cargo pants for zoo keeper costume for toddler. Thanks to your clear directions it was easier than I imagined and the results are great. I’m looking forward to sewing many more for winter wear. BTW, I added a deep fold cuff so I can lengthen the pants with the hopes they carry over to summer wear. Thank you!
So glad it was helpful!!
If you want to launch your own business with your sewing skills, it will be an advantage if you take classes. You should learn more about the terminologies used in sewing, equipment to be used, techniques, as well as how the business runs. You dont want to go to a battlefield unprepared. Learning how to sew is a fun activity that you can do as a hobby or as a source of income.
Cargo pants are loosely-cut pants designed for tough. Good job, what a beautiful design.