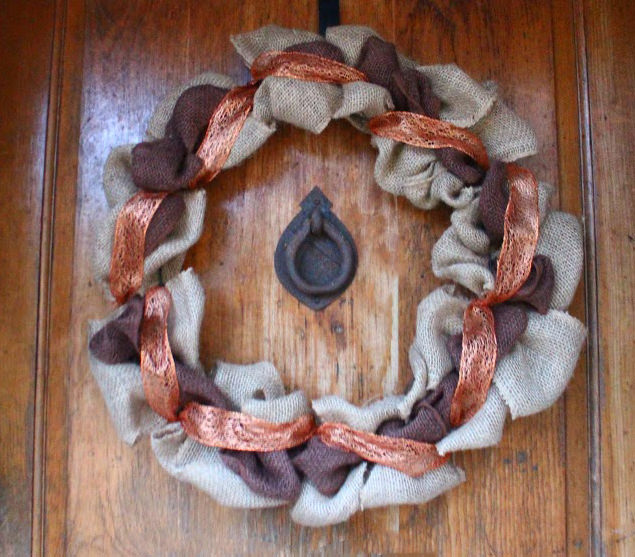
With the holiday season fast approaching, now is the perfect time to update your home to welcome holiday guests. Start off your updates with a beautiful fall wreath! This burlap wreath is super stylish, lasts several seasons and only takes about an hour to complete!
DIY Easy Burlap Fall Wreath
Inspired From:
You Will Need...
- Wire Wreath
- 2 Rolls of Burlap Ribbon
- Ribbon (Optional)
- Wire
- Wreath Hanger
Step by Step Instructions
Step 1
Step One: Attach burlap to wire
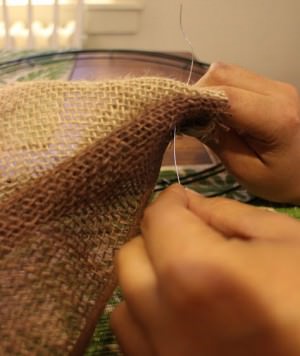
For my wreath I chose to use two different colored burlaps. You can use one color or a regular burlap with a patterned burlap. As long as you have two rolls of burlap you should have enough to make it around the entire perimeter of the wreath. Start by taking the end of your burlap rolls and folding it into quarters, pinch the fold to keep it in place. Take your wire and thread through the folded end of the burlap. Tie the wire to the underside of the wire wreath frame until the the burlap is secured.
Step 2
Step Two: Push the burlap through the frame
Now that the burlap is secured to the frame, push the burlap through the inner section of the frame and create a loop. If you are using multiple colors, choose which color you want on the inner part of the frame and start with that loop first. Next, I took the dark brown burlap and pushed that through the middle section of the frame. If you are using all one color you can easily just continue pushing the burlap through each section of the wire frame and create three loops. I chose to alternate colors so I pushed the lighter colored burlap through the inner section of the wreath, followed by the dark brown in the middle section, and then finally the lighter colored burlap on the outer section again.

Step 3
Step Three: Pinch, twist, and repeat
Once you have completed your first set of loops you want to bunch all the loops together and pinch them to hold them in place. While pinching the loops together, flip your wreath frame over and twist the excess burlap that is hanging underneath. This will help to keep your burlap in place. If you are using two types of burlap, this twist will also help to keep the center piece in place. Repeat step two and continuously pinch and twist until you have filled the entire wreath frame.

Step 4
Step Four: Secure the burlap and add ribbon
Once you fill the wire wreath frame with your burlap, it is time to secure either end to the frame. I simply cut the burlap and folded the end into quarters again. I then threaded wire through the folded end and tied the burlap to the back of the frame. Once the burlap is secured it is time to add the ribbon! Adding ribbon after adding the burlap will make it easier to change the look from season to season. I chose to add orange ribbon for a festive fall look. I used wired ribbon and looped it through the back, outer ring of the wreath frame. Once the wired ribbon was secured to the back of the wreath frame I crossed the ribbon over the burlap and threaded the ribbon through the inner ring of the wreath frame. I continued alternating until I reached all the way around the wreath and then secured the ribbon to the back of the wreath frame. Because it didn’t use wire to secure the ribbon, it will be easy to remove the ribbon and replace it from season to season. I suggest choosing a wired ribbon, because it is easier to shape and form it into whatever shape you want. Once your are all done you can even use the ribbon to create a cute festive bow. Now that you’ve completed your wreath, use a wreath hanger or picture wire to display your new burlap wreath!


Leave a Reply