
Hey Lovely Ladies! Today is such a treat because we’re getting a fabulous cookie recipe as well as 10 Tips for Holiday Cookie Giving! Today’s guest post is by Bridget from Bake at 350.
Cookie Recipe
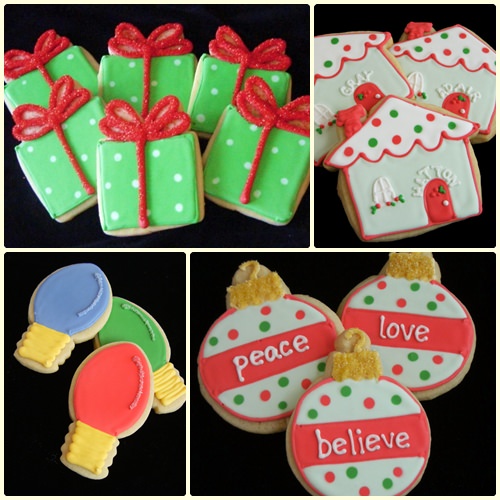
If you are looking for a recipe for no-fail, cut-out sugar cookies, be sure to check out my go-to and super yummy cookie recipe for Vanilla Almond Cut-Outs. While I love cookie decorating ALL the time, Christmas time is the perfect time to bake, decorate and GIVE cookies!
10 Tips for Holiday Cookie Making & Giving
Let me share a few tips with you for making and decorating sugar cookies:
1. Have a plan. Gather up a cookie cutter or two and sketch out a few designs ideas. (I’m always borrowing my kiddo’s crayons and colored pencils to do this.) Need inspiration? Check out cookie blogs, printable pages and kids’ coloring books for designs.
2. Limit your designs and colors to just a few. Lots of colors and shapes can be overwhelming. Try one color scheme, such as red, green, white and mint.
3. Buy the specialty supplies you will need, such as good gel/paste food coloring (I use AmeriColor) and a quality meringue powder from a bakery supply shop.
4. Bake the cookies a day (or two) before you plan to decorate. (This breaks up the process and makes decorating more fun!)
5. Make royal icing, divide and tint. (Royal icing can even be made a day or two ahead, just press plastic wrap onto the icing, cover and refrigerate.)
6. No cutting the ends off of baggies….invest in the proper equipment. You’ll need disposable decorating bags and tips for outlining & detailing, as well as squeeze bottles for filling.
7. As far as decorating tips go, don’t be intimidated by the HUNDREDS that are available. For cookie decorating, you really only need a few plain tips: #2 & #3 for outlining and a #2 or #1 for detailed piping.
8. If you are decorating cookies with kids, have everything ready before calling them in to decorate. Cookies baked, icing made, piping bags filled and bowls of sprinkles…the more you plan ahead, the more fun they (and you) will have!
9. Allow your decorated cookies to dry OVERNIGHT! You’ll want the cookies to be totally dry before packaging or freezing.
10. After an overnight dry, your cookies are ready! All they need is a clear cello bag and a bow, or a pretty box or tin. Decorated cookies can also be frozen (yes, really!). Place in an individual bag or stacked in baggies (with wax paper between layers)…put those bags in a freezer-safe plastic container and pop in the freezer. To thaw, let the cookies sit at room temperature in the freezer packaging for several hours. Voila! Cookies ready for that unexpected company!
I hope you all have fun decorating your cookies! Thank you so much, Laurie, for letting me stop by Tip Junkie…where I always learn something new! It’s an honor!

Copy & Paste the Code into your Blog Side Bar!
<a href="/category/christmas/" target="_blank"><img src="https://i212.photobucket.com/albums/cc10/TipJunkie/Top10holday_button_button.gif" alt="Homemade Christmas Ideas" border="0"/></a>

These are the cutest cookies that I ever seen! I guess I should give it a try to make cookies like these. Thanks for sharing.
Wow! Those are so cool and cute. These are perfect for my child’s birthday party but the problem is that I can’t make those cookies looks actually like that. LOL.
This recipe is similar to the “Sour Cream Cookies” my mom made when we were kids. I think I will try this out tomorrow.
With 4 kids in the house I dont think our decorating will turn out quite as classy as yours but its sure to be fun!
OK, I am using your sugar cookie recipe…mostly because my mom stole my cookie book, plus yours looks like a great recipe. We are baking cookies tomorrow. Making Christmas cookies is one of my favorite things. 🙂
Bridget’s tips are invaluable and her cookies are gorgeous!!! If you head on over to her site to see her cookie recipe you’ll definitely have success! http://bakeat350.blogspot.com/2008/04/taste-of-yellow-yellow-rose-sugar.html