Howdy people! Last week we got some insights tips on logo design and how to make it work for your brand. In line with our graphic design and branding series, this third section will briefly give you the basics and a step-by-step procedure in making a simple button and a blinkie using Photoshop.
As I’ve mentioned in the first section of this series, Graphic Design Tips To Improve Brand Recall, a button or a blinkie can both be used as a form of advertising which you can use to swap with bloggers and other websites.

This little button can actually make so much difference in your traffic and brand recall so it is a good idea to learn the basics so you can make your own button too!
Okay, so let’s get started!
How to make a button using Photoshop:
1. If you have an image that you want to use, go ahead and open it on Photoshop.
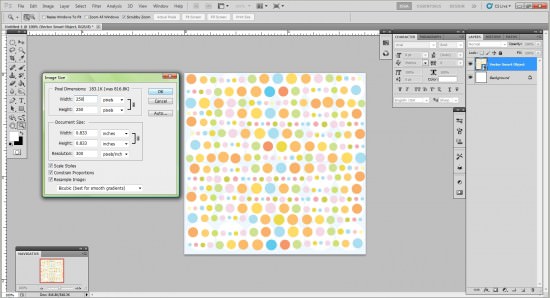
2. Resize it to 250 x 250 pixels. Sometimes there are websites that accept a button this big but if not, then resize it to 125 x 125 when they need it at this size. Personally, I like the size 175-225 but for this tutorial, let’s just stick with 250 pixels. The button need not be square all the time, you can make a rectangular shape or a round one depending on your taste. The detail you have to remember is to keep all sides at 250 pixels maximum. Say for example you make a rectangular button with a dimension of 500 (width) x 250 (height), you need to resize it proportionally so that the 500 pixels would be 250 pixel. The result would be 250 x 125 pixels. Hope I did not confuse any of you on this tidbit.
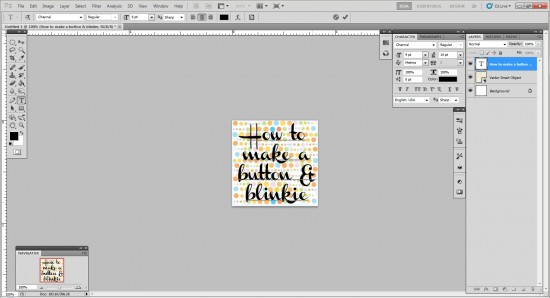
3. Press T or the Text button on the tool bar on the left and write your copy. Choose a font that is readable at this size and don’t over-crowd the whole box with text.
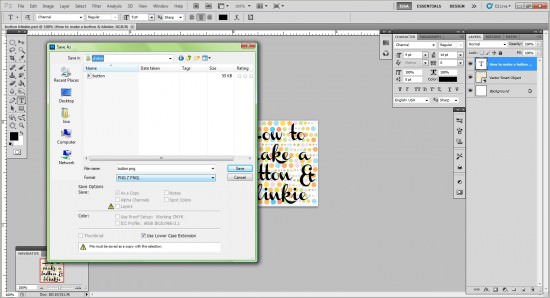
4. Save the button as a PNG file which makes the background transparent. You can see the effect of this one when you use a shape that is not like a box, say for example, a circle. With a circle, you may need to make the transparent background so when it is posted on a dark background, you won’t see a white box surrounding your round button.
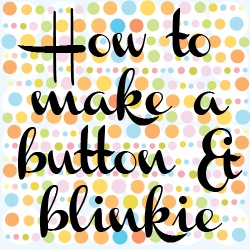
Here’s the finished simple button:
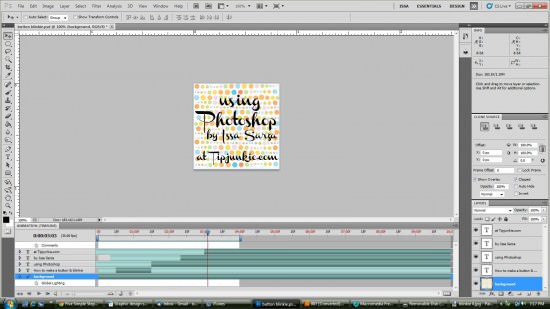
How to make a blinkie using Photoshop:
1. Coming from the previous tutorial on button, just add a new layer and add your text in.

2. Using the motion workspace, you will see the teal time line at the bottom. You can begin moving by sliding the ends to the frame where you want your layer to show up. You can hit the play button so you can view your work.
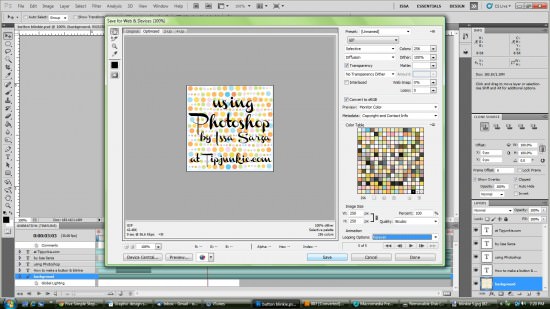
3. When you’re satisfied with the timing of each layer, you may now save it through this sequence: File>Save for Web & Devices and just follow these settings and then save as a .gif file.
You should end up with something like this:
Pretty neat, huh?
Okay, so that wraps it up for this section! See you again next Saturday as we close the graphic design and branding series with an exciting topic of designing business cards wherein we’ll know what works and what doesn’t!
GRAPHIC DESIGN & BRANDING SERIES:
1. Graphic Design Tips To Improve Brand Recall
2. Logo Design Tips: Create A Logo That Works
3. How To Make Website Buttons And Blinkies Using Photoshop
I’m Issa and I am a firm believer of using creativity in our everyday lives. A freelance graphic designer, an entreprenuer and a budding vegetarian cook are just few of the things that I am. As I continuously cultivate my inner child, I discover a zest for creating and making things such as crafts and other digital products like party invitations.
Join me at Issa Sarza: Creative Living and catch great creative freebies and ideas on how to live an inspiring and artistic life!

Oh man, I so heart you Tip Junkie!
Thanks for this!!
Thanks SO much for this! Super helpful, and easy peasy enough for me to understand 🙂 Off to make a new blinkie button for Sunshine and Sippy Cups right now!!
Thanks! I just made one!
THANK YOU!!!! love this…
Thankyou Issa…..I need to hide in a closet for a day and learn photoshop! So much to learn as a new blogger 🙂 This is helpful for me!