The Tip Junkie Creative Community has so much functionality that I don’t want you to miss out on any of the fabulous things that it does. {Of course it’s free. HA!} So, over the next few weeks I’ll be sharing tips to help you maximize your experience on the site.
Video: How to Add a Project in Your Online Craft Room
In the video above ~ I’ll walk you through adding your creative idea, DIY project, recipe, party, tutorial, or free printable on Tip Junkie. It’s so easy, you probably won’t need it but if you want a more detailed video with examples {click link} I made a longer video for those who’d like it. {knuckle bumps}
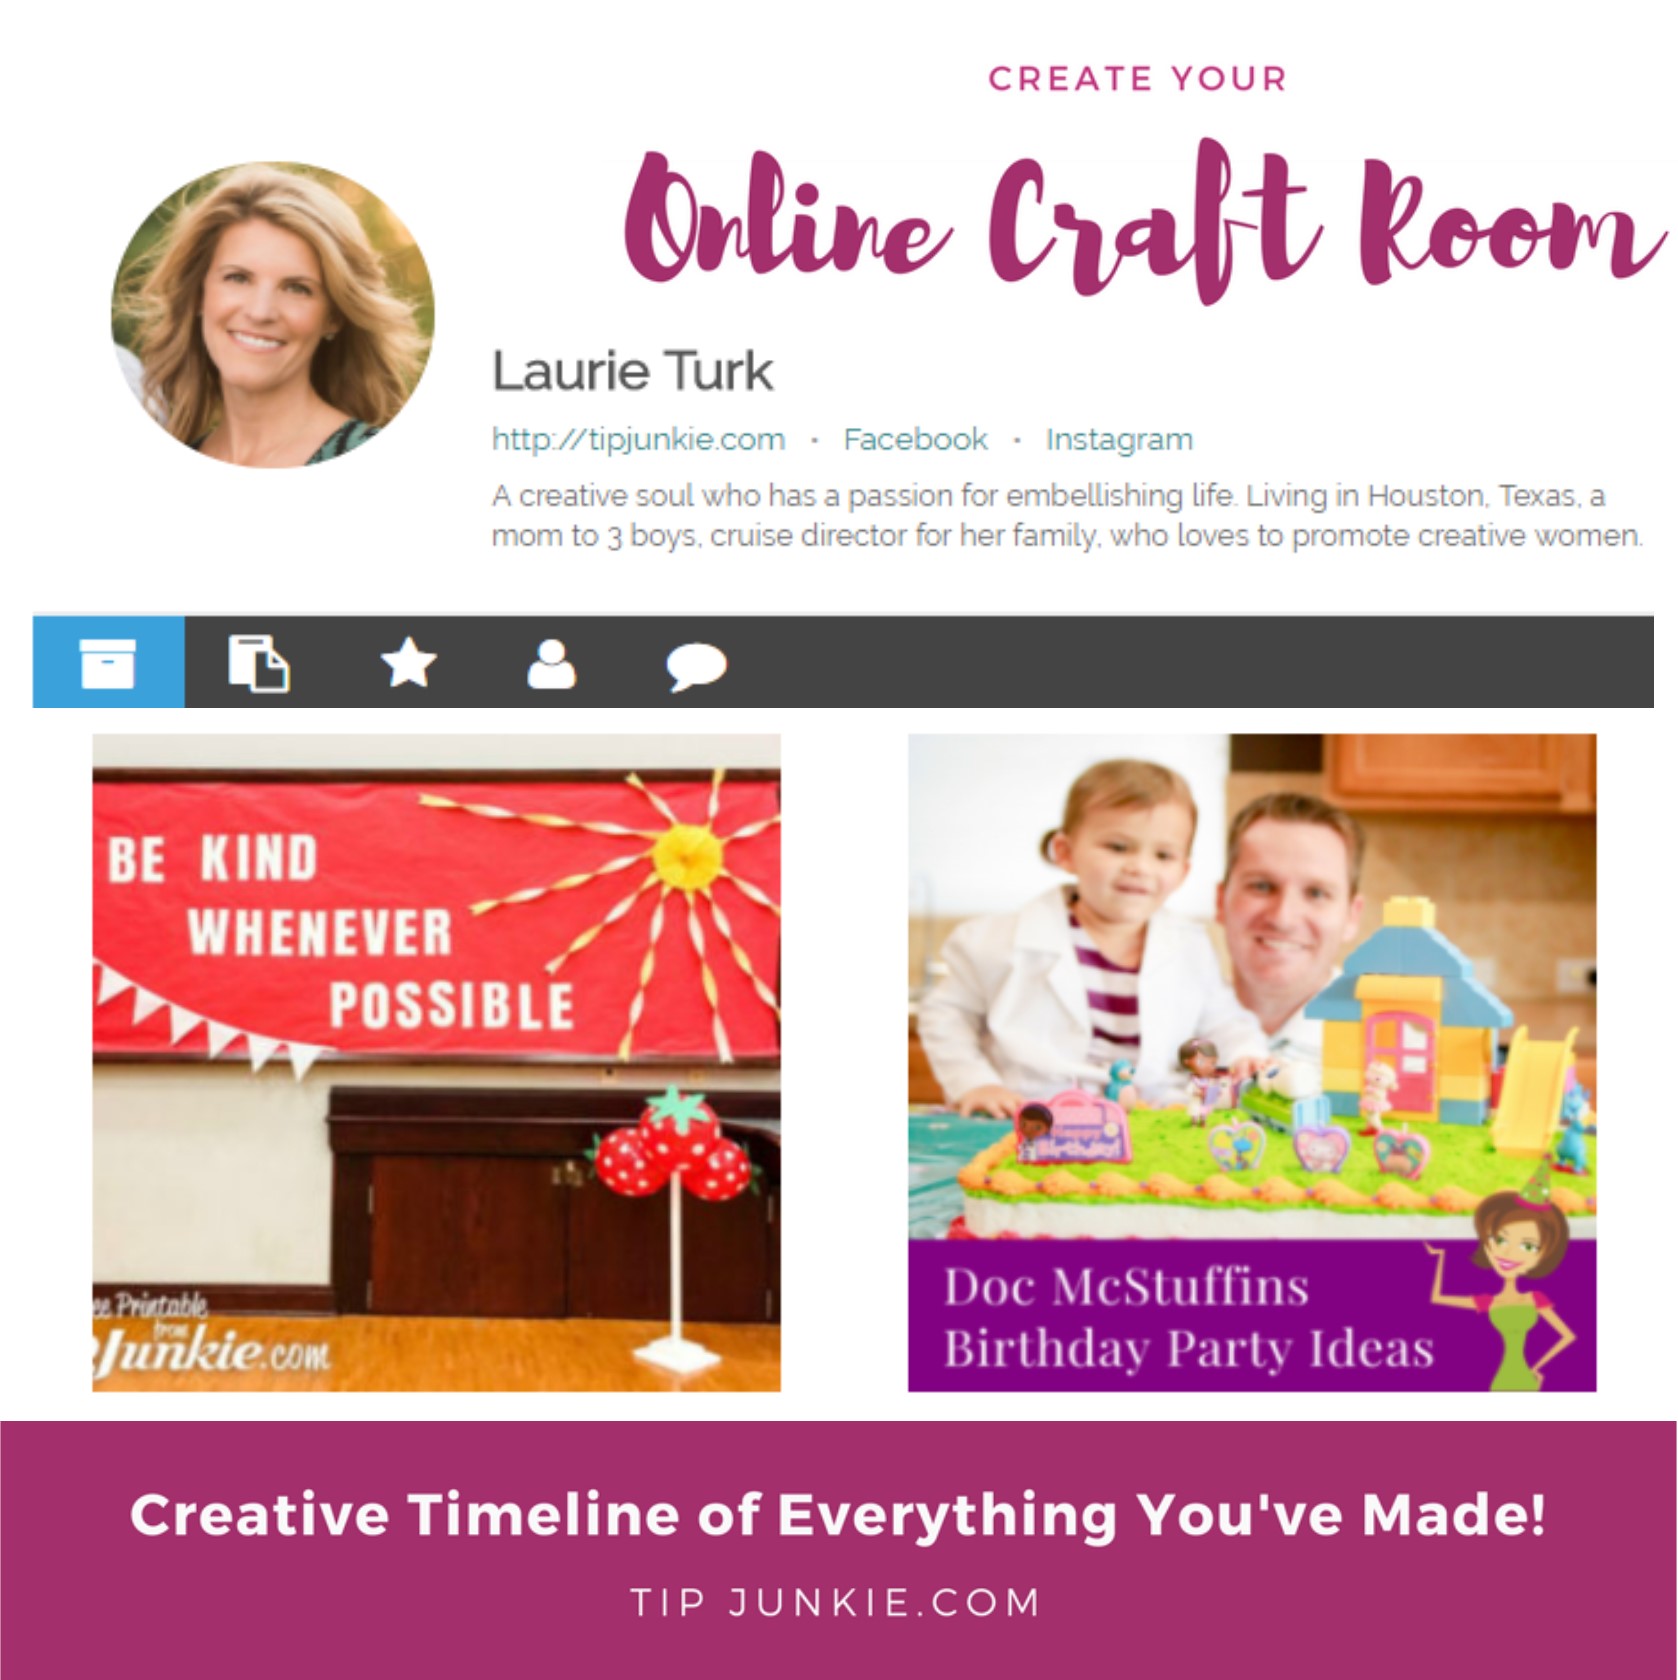
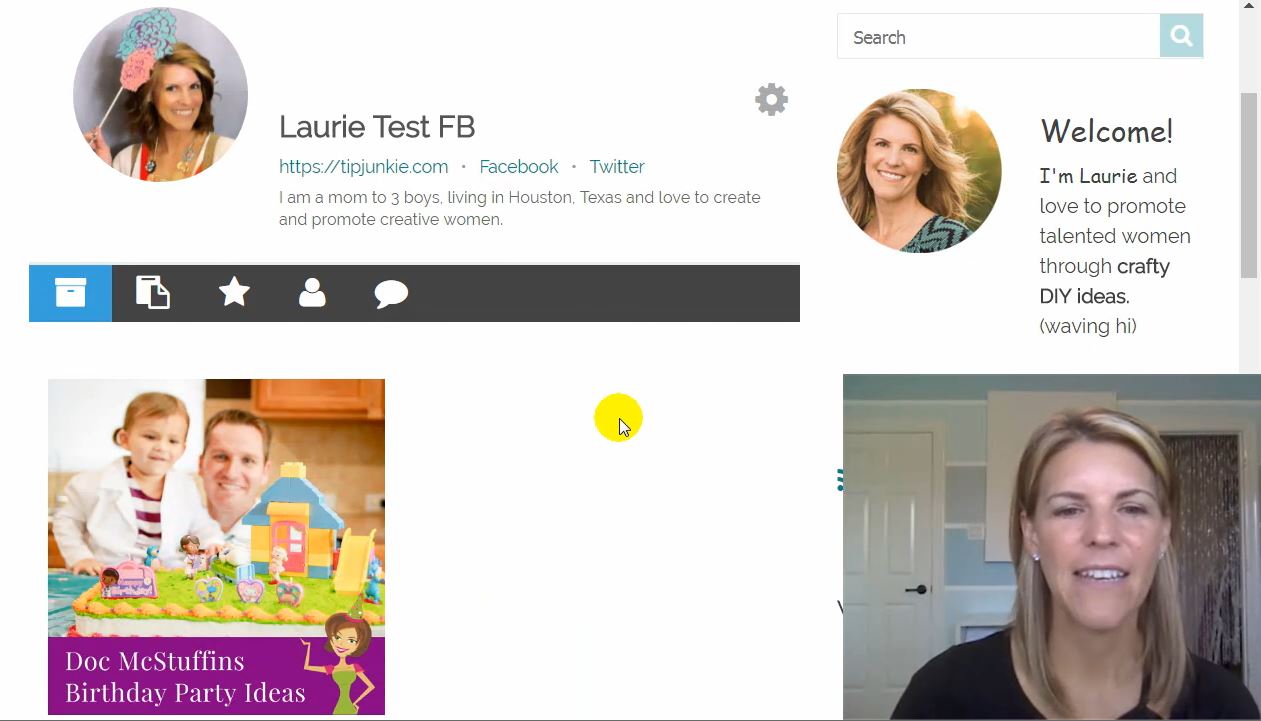
Your Online Craft Room
Consider the Tip Junkie Creative Community as your own personal online craft room. Login and you’ll be able to quickly add your memories that are just sitting on your phone or computer. {or storing in the back of your closet} I’ve made it super easy for you to show other people besides Aunt Ruth how to make that scarf or that sugar scrub or the magnetic nail polish you are so proud of! {wink}
The best thing is that we WANT to see them. We want to learn how to make them too. And we want to get to know you better through your talent and incredible memories ~ as we’re crafters too. {high fives}
Pictured Timeline of Creative Memories
Upload all the amazing things you’ve made and create your own crafty digital timeline that you can access anytime and anywhere. {squeal in delight}
Wondering what to Upload? Anything you want!
- Before and after pictures
- Anything handmade: cards, gifts, paper crafts, activities for kids
- Recipes
- DIY Decor and home improvement projects
- Parties
- Traditions, family time, and fun ideas
- Hacks, tips, and tricks
- Files you made
Skies the limit, girl. If you have a picture of it and it’s creative ~ we want to see it. {family friendly of course.} Secure your creative memories online so that you can save the time you would have spent rummaging around in your house or random pictures on your computer. Your online craft room doubles as an online filing cabinet of all the amazing memories you’ve created like gifts, parties, traditions. decor and more. You’ll inspire other women in the process. Whoohoo!!
Always Easy to Find
No matter where you are, you’ll be able to access your photos and tutorials online, and they’ll all be in one place….your own personal craft room. HOW fabulous is that? Plus you’ll be able to share your crazy-amazing talent with others!
Whether you’re with family at Thanksgiving and need that specific recipe or at a reunion reminiscing about that incredible quilt you made… you’ll be able to quickly pull it up. Easy breezy. Tip Junkie will catalog and file away all of your favorites so that you can easily find them later. You’ll be able to pull them up anywhere you are in the world from your tablet or phone.
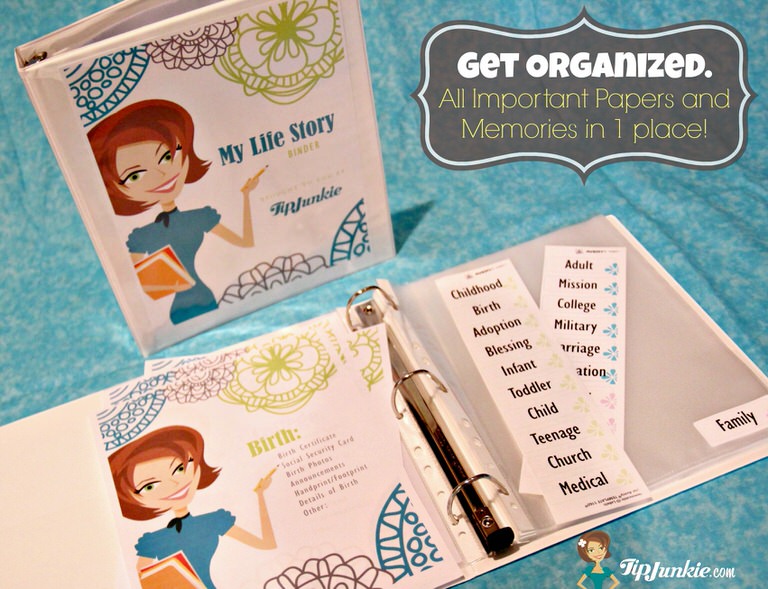
My Life Story Planner {example}
Use the Tip Junkie Creative Community {TJCC} as your own online craft room! It’s worth the short amount of time it takes to upload tutorials. I PROMISE.
I’ll show you how to add a project to your online craft room on Tip Junkie. It’s really easy and you don’t really need to watch a video or see all these steps. I’m just silly and want to make sure that no matter how comfortable you are with using a computer, tablet, or phone you’ll be confident that you can upload your amazing ideas onto your online craft room.
Video: How to Upload to Your Online Craft Room ~ LONG
Feel free to fast forward the video to specific time to answer any of these questions…
2:50 ~ How to add an introduction?
4:30 ~ How to add a featured image?
10:04 ~ What is the Media Library?
5:43 ~ Why name your images?
6:52 ~ How to pick a category?
7:03 ~ How to add materials?
8:16 ~ How to add Step by Step pictured Instructions?
10:47 ~ How to add a link?
11:30 ~ How to add pictures I didn’t use into the Gallery?
12:25 ~ How can I upload a pdf file that I made to complete this project?
12:58 ~ What is the “Inspiration Name” for?
13:28 ~ Service URL
14:03 ~ Event
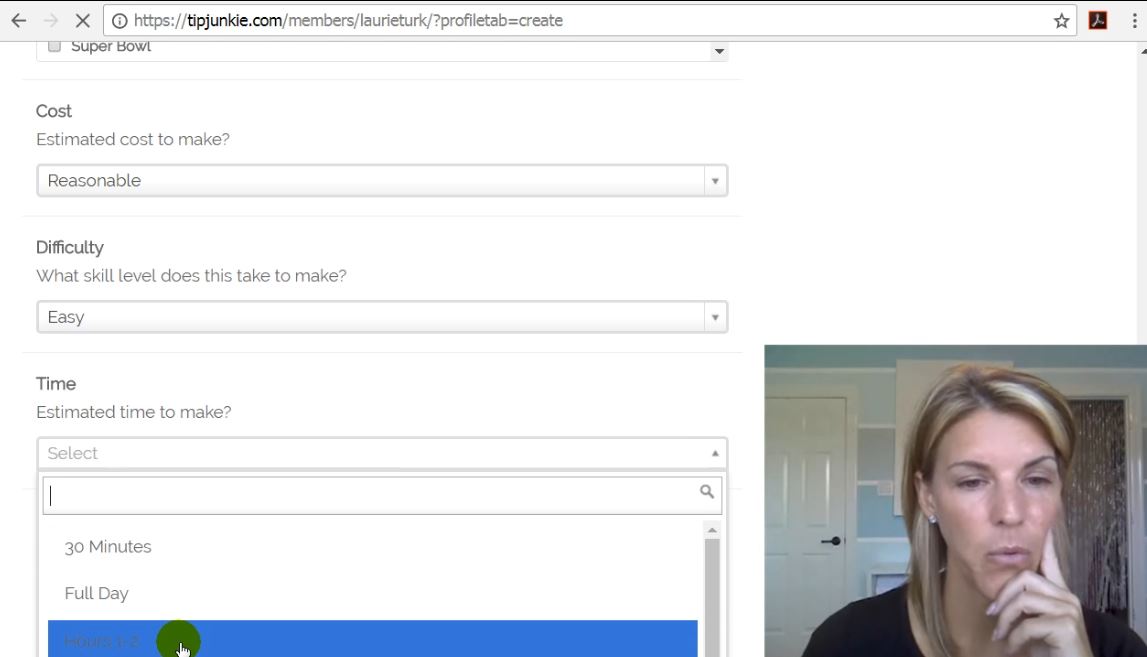
14:40 ~ Estimated cost?
15:19 ~ Skill Level to Make
15:24 ~ Time to Make
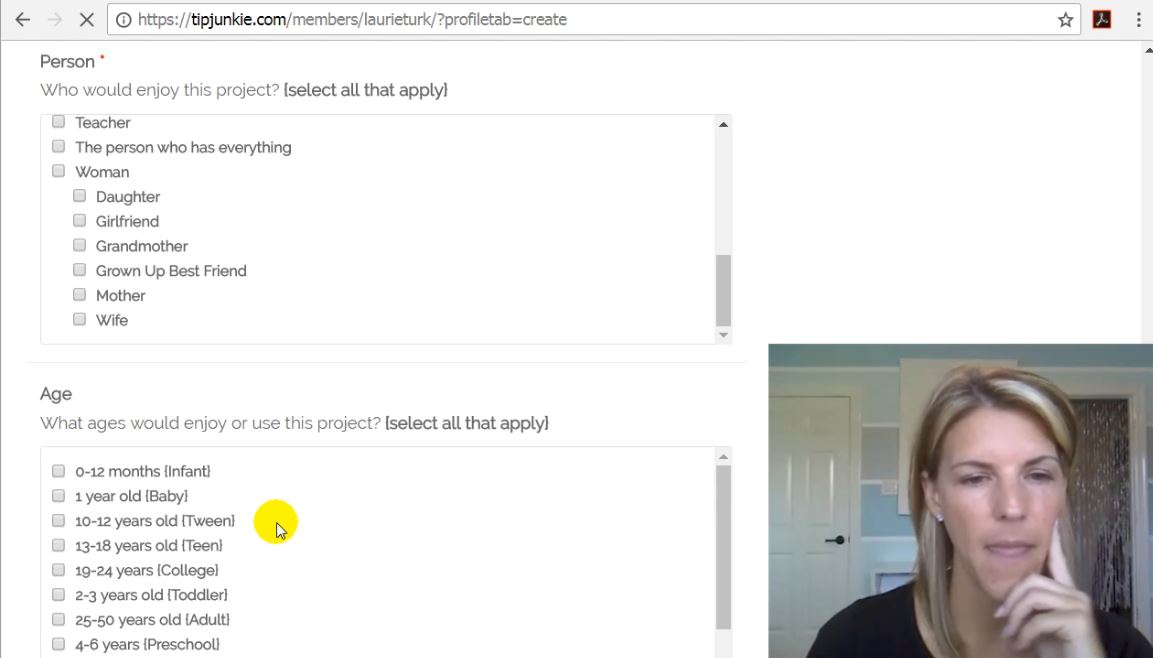
15:28 ~ Person
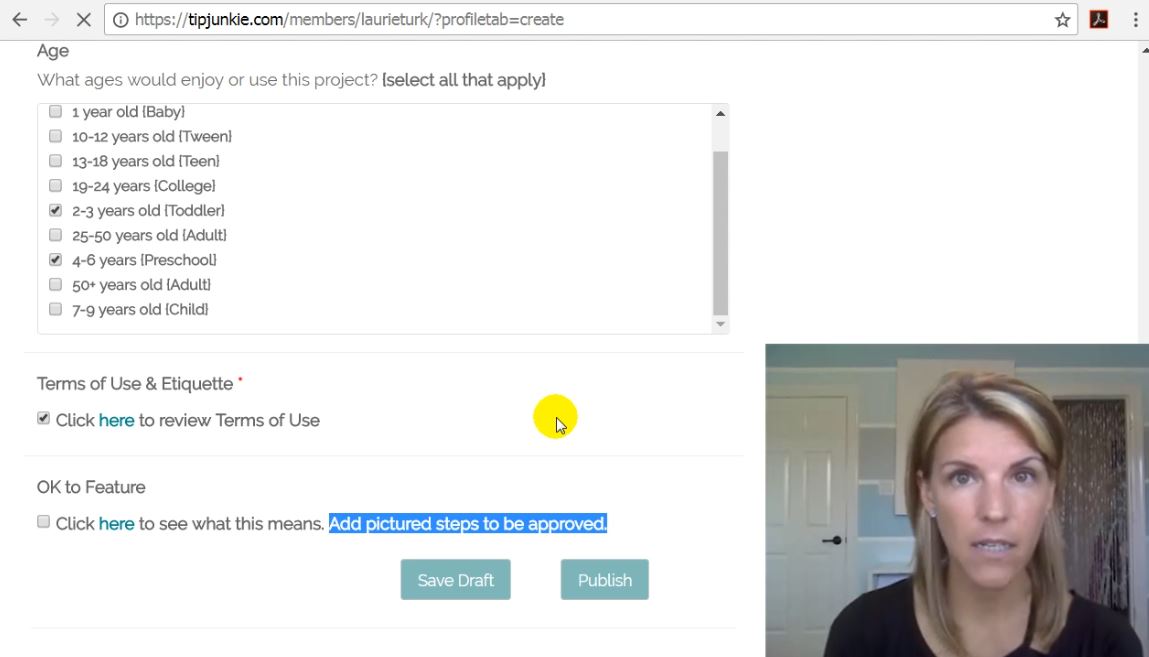
15:33 ~ Age
15:47 ~ Terms of Use and Etiquette
16:00 ~ Can I feature You?
16:11 ~ Can you give me some tips on how to be featured?
16:42 ~ Why do you require pictured instructions in order to be featured?
16:19 ~ What if I have already blogged about my project?
17:25 ~ How to Save Project to edit it later, and not publish it live?
17:21 ~ What’s the difference between “save draft” and “publish”?
17:45 ~ How do I edit a project later?
18:34 ~ What happens when I click “publish”?
19:55 ~ How to Favorite a project
19:24 ~ What will my project look like when it’s published and completed?
20:21 ~ What are the “Tip Finder Categories”?
How to Create a Project in YOUR Online Craft Room
In case you’re like me and would prefer pictured step-by-step instructions rather than a video ~ I’ve also added those below. Sometimes I feel like video goes too fast or I get distracted and miss one little word which then confuses me moving forward.
So here you go and please feel free to ask any questions you have below in the comments. Because if YOU have that question, then I’m sure hundreds of other women do as well. I’d love to be able to clarify it for ya. {high fives}
Step 1: Login
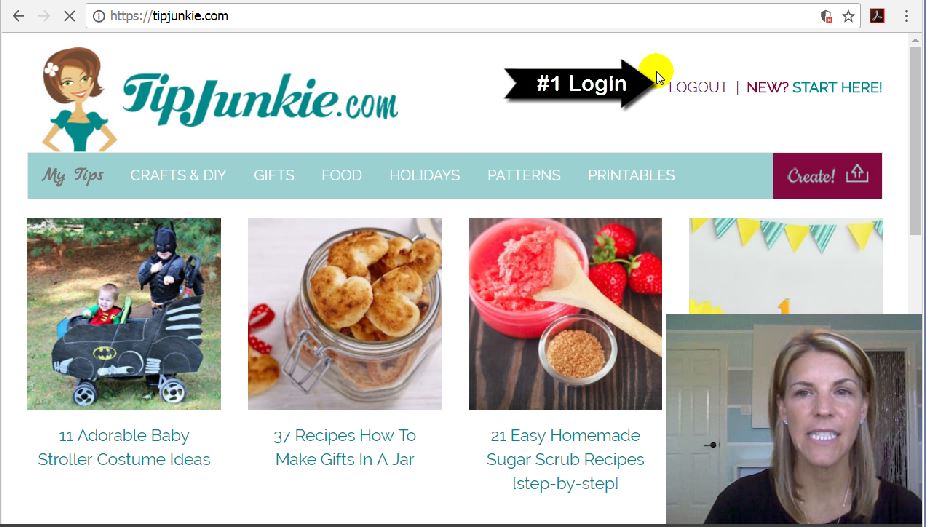
First, you’ll need to login to your account on Tip Junkie. Login or Register on Tip Junkie, it’s free of course.
- How to Update Your Profile {video}
- How to Bookmark Ideas You Love {video}
There’s some fun things you can do while you’re logged in. Click the links above to watch quick videos to learn how.
Next, you’ll add your article or step by step instructions by creating a new project.
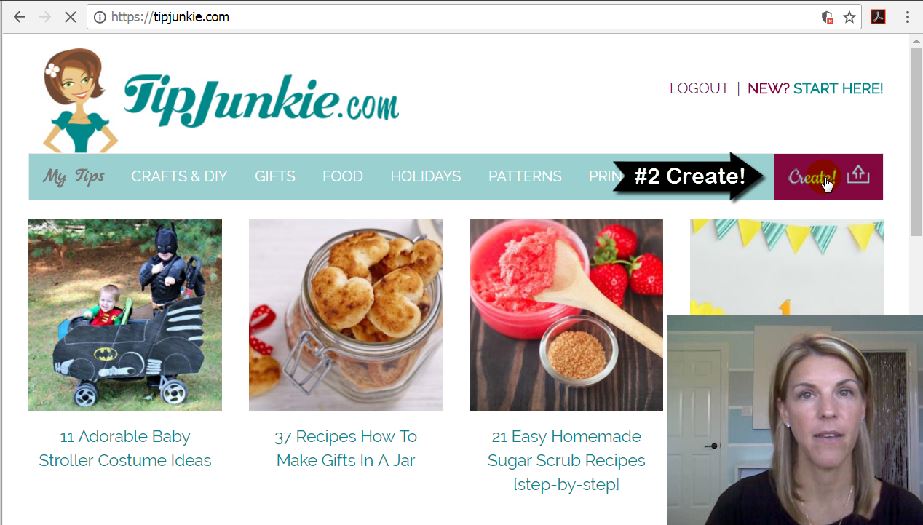
You can do this by clicking the “My Tips” to go to your account or a faster way is to click the “Create” button in the toolbar. This will take you directly to the “add new project” page.
Step 3: Title Project
You can name your project anything you want. However, if you want people to see it and learn from it there are some tips on how to best title your project.
- Be specific
- Make it searchable
The title is not the best place to be cutesy or creative. Members want to be able to know at a quick glance what it is. So be specific and tell them. If it is a party then be sure to add the word “party” in the title. If it’s a recipe, add the word “recipe”. You get the idea. {wink}.
Tip: To get even more viewers to see your project use these types of words in your title:
- Best
- Easy
- Top
- Simple
- Quick
- Cheap
To make your title searchable, add the words you would type into Google to find that idea. So for instance, if the project you are uploading is a “game” then be sure to include words like: game, activity for kids, party game, etc.
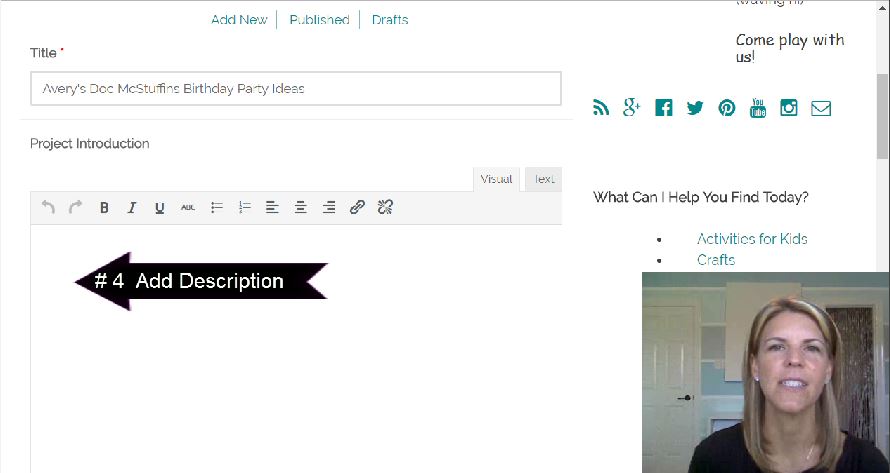
For your title to be searchable for yourself, add something personal that you would later use to find it. For instance, as an example I am uploading my nieces’ birthday party so I’m going to add her name, Avery to the title so I can find it later quickly.
Step 4: Introduce Your Project
What helps me when I’m adding a project to my craft room is pretending that I have never heard of this before. From that perspective, I introduce what I made as if I was telling my sisters best-friend. It really helps me stay casual but also informative.
What would she want to know….
- What is it?
- Why did you make it?
- How do I use it?
- Why should I care? or What’s in it for me?
Since we are all busy women don’t bury the lead start out gang busters by telling us right out of the gate how this project has helped you or improved your life somehow or how much fun you had making it. Cuz really that’s what we want to know.
Set our expectations of what it is, why you made it, and why should we care. Also sb sure to let us know all the different ways you can use it or versions that you’ve made. Since you know this project better than anyone else ~ share what you know! More information is always better.
Tip: Don’t assume that we know what your project is just because you showed us how to make it. You’ll need to spell it out for us. HA!
Step 5: Add Featured Image
The featured image is the image that I will use throughout the entire site. So when someone does a search, it will pull up that image.
Please make sure all images you upload are compliant with copyright:
- Yours. You own it.
- Stock image or you have the rights to use it
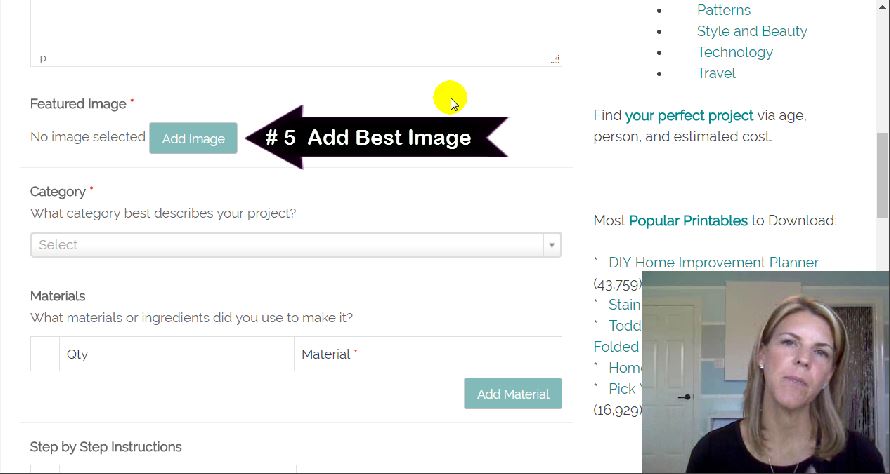
To add a featured image, click “add image” button and then click “select files“. This will bring up your pictures from your computer {or tablet or phone}. Simply select the prettiest picture of your completed project.
Ideal size is square, 1:1 ratio. However, there’s no need to get fancy or worry about editing your image unless you want to. Any size image will work just fine.
Tip: Video times for these image questions:
- 4:30 ~ Step #5 How to add a featured image?
- 10:00 ~ What is the Media Library?
- 5:43 ~ Why name your images?
Advanced: If you do want your images to show up in Google Image Search, then you’ll want title or name your image the same title that you named this project. {optional} Also, copy/paste the title into the “Alt Text” as shown above which is closed captioning for the Google bots. {so to speak}
This is another perk to uploading your project onto Tip Junkie as you get to use my rankings and reputation with Google over the past 10 years to drive your projects higher in indexing and search results.
Step 6: Pick One Category
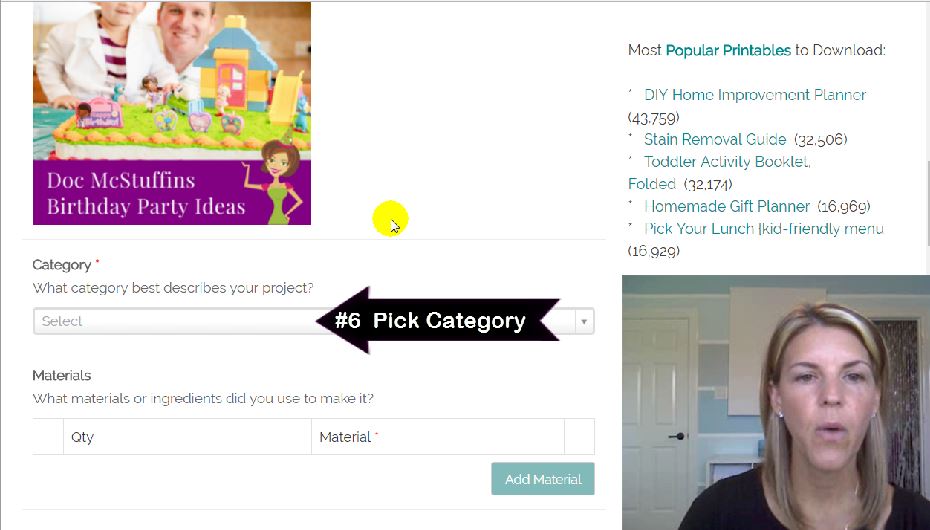
To simplify things, you’ll only need to pick one category from the drop down menu. Don’t worry if your project doesn’t match exactly to the category options. If selected for feature I will edit it and make sure it goes into the proper category for readers to find.
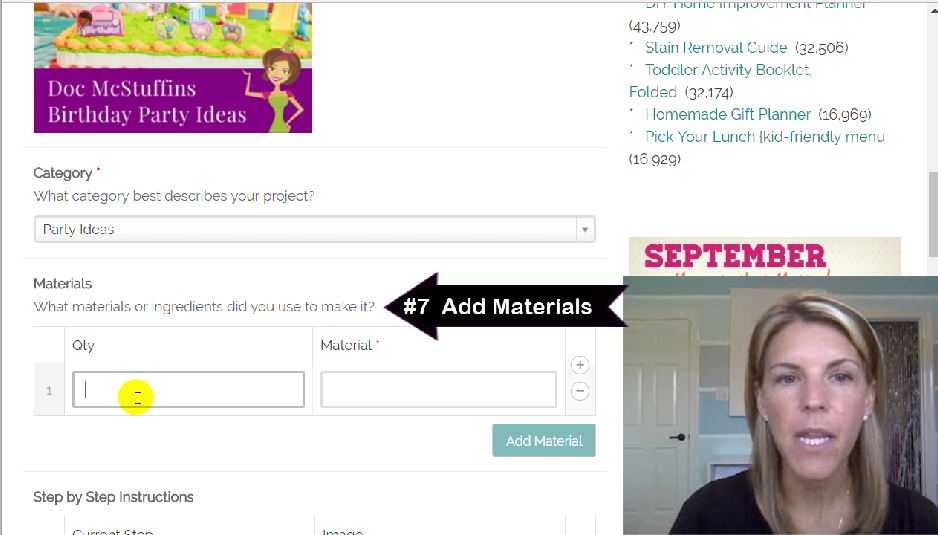
Step 7: Add Materials
The materials are items that you have used to make this project. This is an optional field that you don’t need to fill out. However, it is strongly suggested as I’ll be improving upon this section in the future and we’ll be able to do some really cool stuff with it if you choose to fill it out.
Click “add material” button to get started and add your first material.
- Quantity = Amount
- Material = Item or Product or Food
Example for Recipe:
- Quantity = 1 cup
- Material = Flour
Example for Project:
- Quantity = 1 Can
- Material = Red Spray Paint
This way we can click “red spray paint” to find all the amazing things we can make with red spray paint. {squeal in delight}
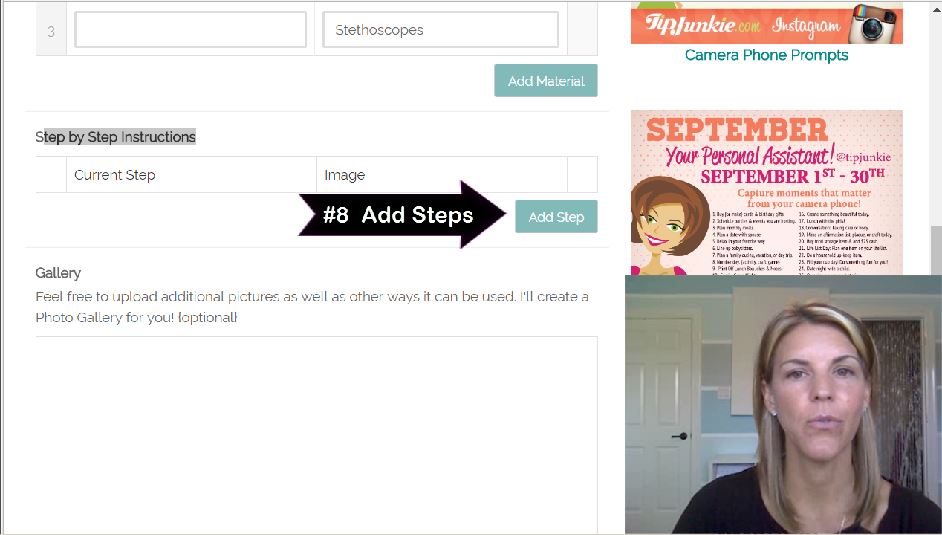
Step 8: Step by Step Instructions
The steps are also optional but highly suggested. Here you can add as much or as little as you want. {high fives} You can add steps with or without images but images are preferred. You can also add steps with images and no text but both are preferred.
When adding the step by step instructions, I find it easier to add the picture first because it organizes my thoughts. {I’m a visual learner} However, you can do it any way you want. You can even add a brief outline save it as a draft and then go back later to add in the details. The system is very flexible.
Tip: If you add all the pictures then “save as draft”. This might make the process faster and this way you can save your work in case you get interrupted. Then edit the project to add the text descriptions. {or visa versa}
To get started adding the step by step instructions, click the “add step” button.
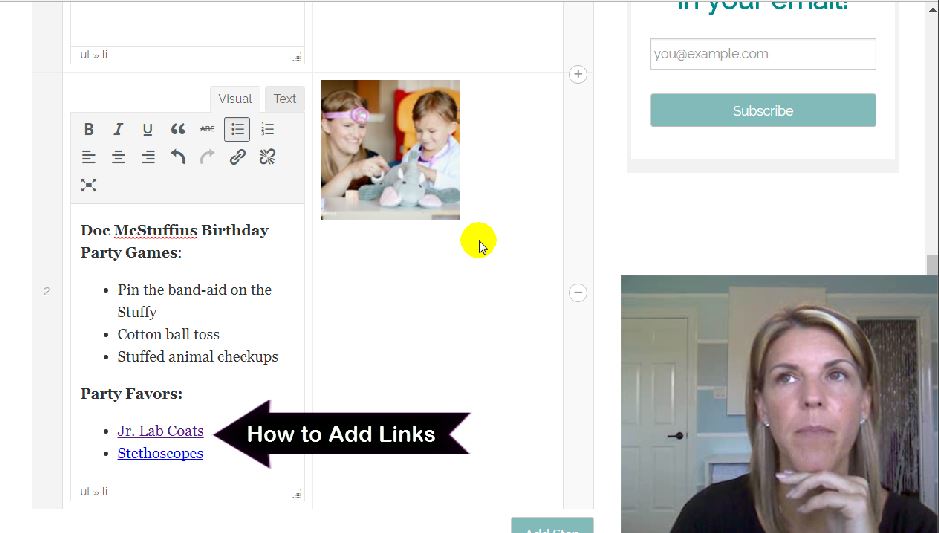
The first box with “visual” and “text” tabs is for text and descriptions just like the “project introduction” section. The second box is for the image.
Visual ~ This tab you can type anything you want with icons at the top to help format it the way you want to.
Text ~ This tab is if you want to copy/paste or edit HTML. {advanced}
Tip: Video times for these image questions:
- 10:47 ~ How to add a link? {paper clip icon}
Step 9: Picture Gallery
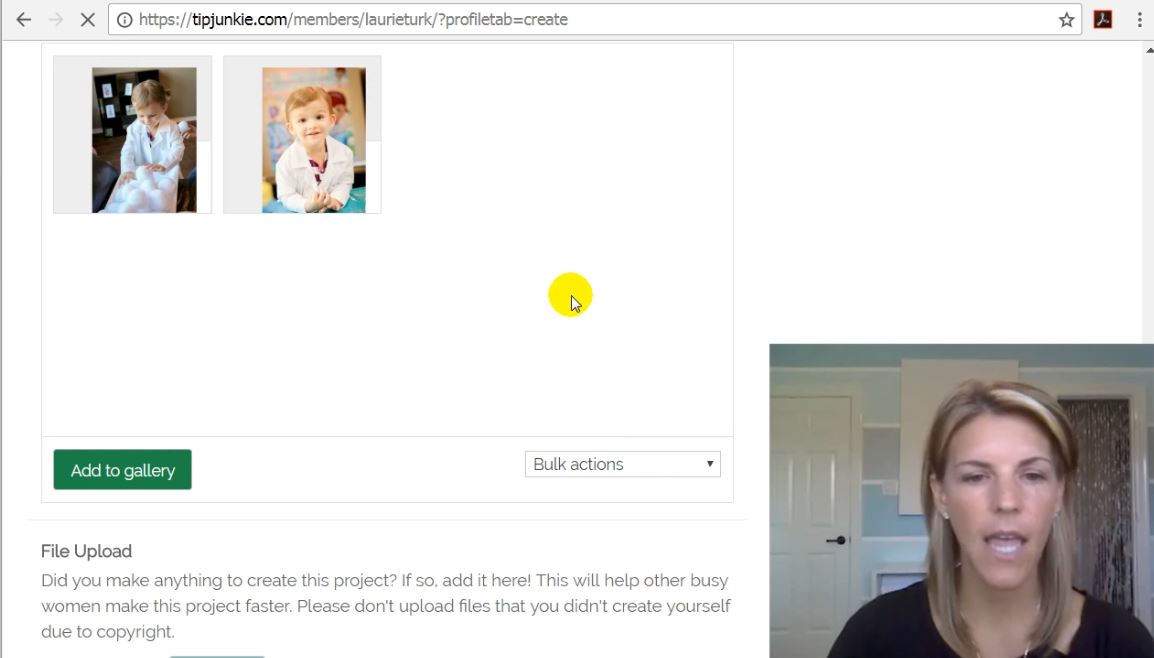
Upload the remaining pictures that you didn’t use in the instructions into the image Gallery. This is also a great place to add pictures of different ways to use it and different versions.
Tip: Video times for these image questions:
- 10:04 ~ What is the Media Library?
- 11:30 ~ How to add pictures to Gallery?
Step 10: Upload File
One of my favorite things about the online craft room is that you can upload the files that you made to create this project, party, recipe, craft, clip-art, etc.
Just like with the images, only upload pdf files and .doc files that you created and/or have permission to distribute. Tip Junkie obeys all online copyright laws and strives to protect the rights of others.
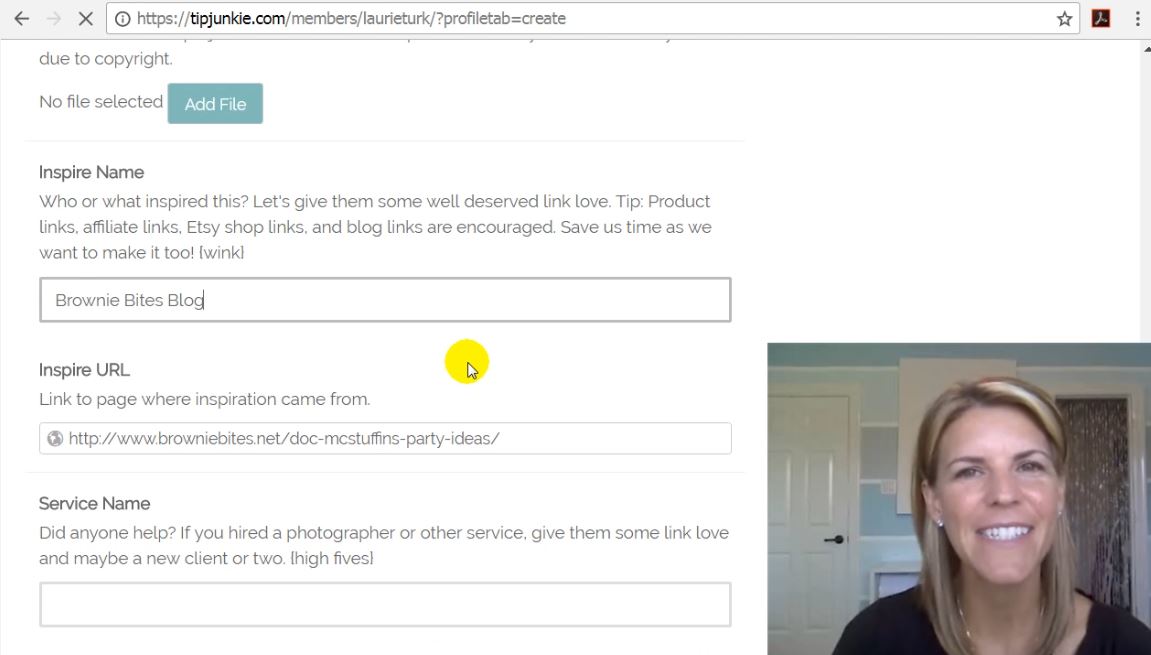
Step 11: Inspire Name
Let’s give credit where credit is due. Link to the original source or idea that sparked the idea for you to make this project. We love to see what inspired you to make this project as well as other ways to make it. This will not take anything away from your amazing project. In fact, it will boost up both your project and the original source linking them both to Tip Junkie and using my 10 year reputation online with Google and other search engines.
This is an optional field and should be used for links directly to the tutorial, not a home page. Linking to a home page or non-relevant site is bad form and irritates Tip Junkie readers. So be sure to use this field appropriately to continue the readers journey and bring them additional value or insight.
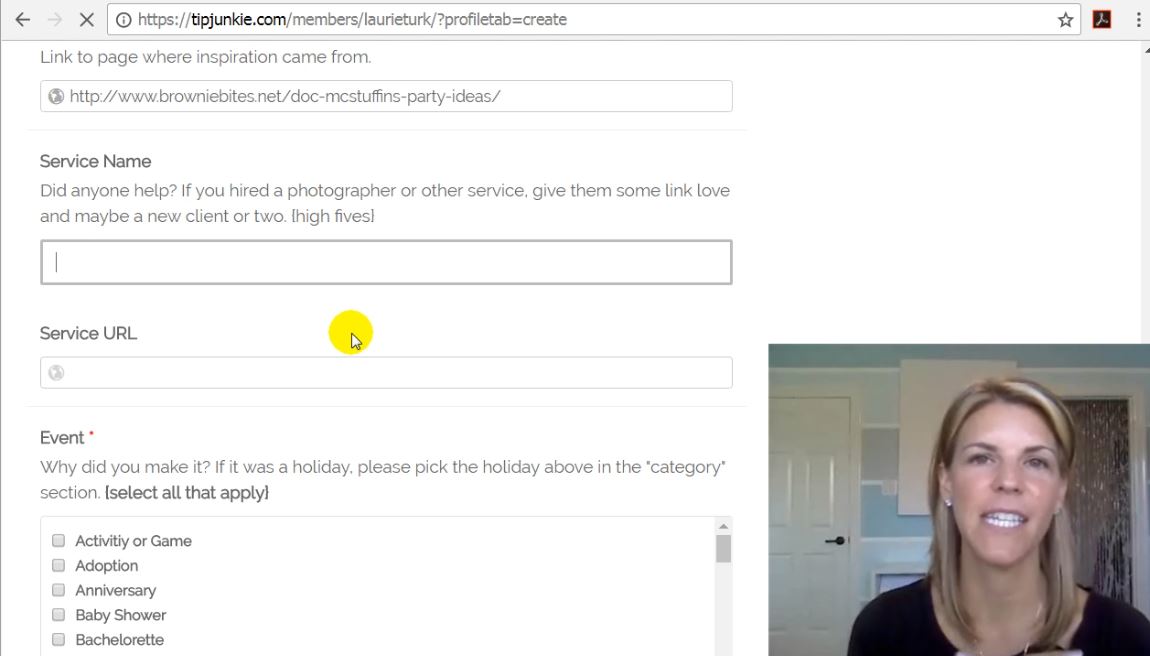
Step 12: Service Name
We are continuing our link love by adding “service name” and “service url”. Use this optional field if you have hired someone to help you with your project in anyway. This is where we are promoting women in business or any business for that matter!
- Graphic Designer
- Photographer
- Small business owners & Etsy shops
- Hairdresser
- Seamstress
- Decorator
Sky’s the limit. Give link love to anyone who has helped with your project in any way big or small. We’d love to be able to hire them too.
Right now you can only add one service but soon you will be able to add as many as you’d like. You can also add these links into the project Introduction or any of the steps. {wink}
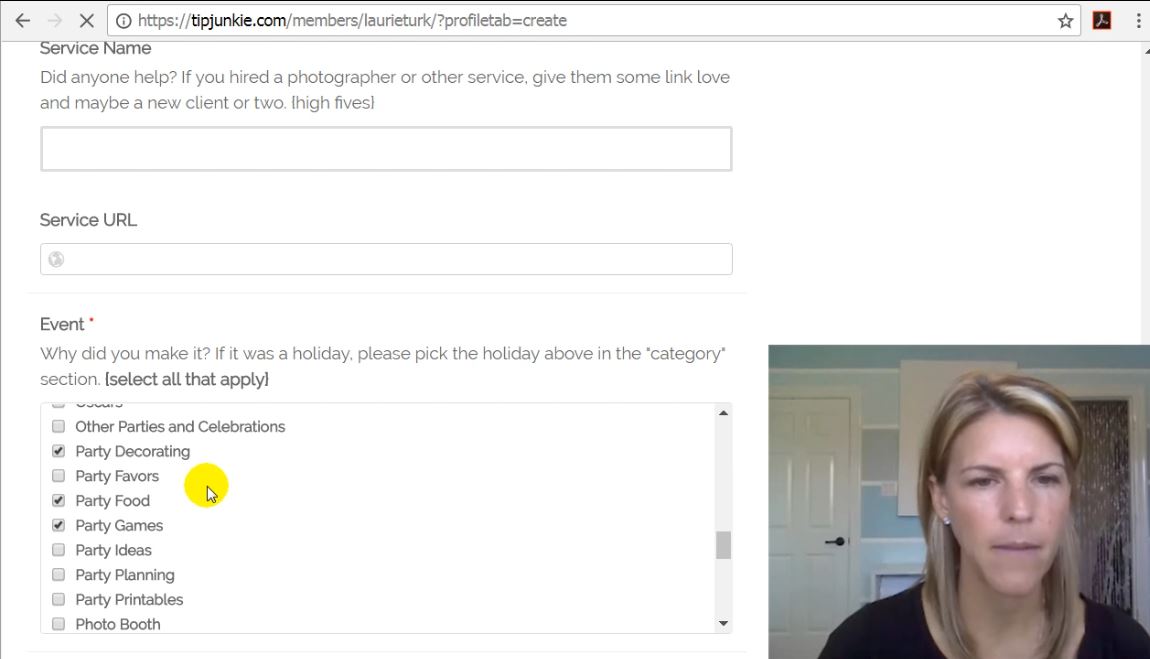
Step 13: Choose an Event
The event is a mandatory field so try to use the one that works best. You can also choose all that are applicable! {multiple} This is mandatory because so many of our projects overlap these categories and instead of having hundreds of categories, I found that it’s easier to add these few additional fields to really help Tip Junkie readers find what they are looking for in a different way.
Some generic fields you can use are:
- For Fun
- Family Life
- Tips and Tricks
Most used events are:
- Homemade Gifts
- Free Printable
- Party Ideas
- Activity or Game
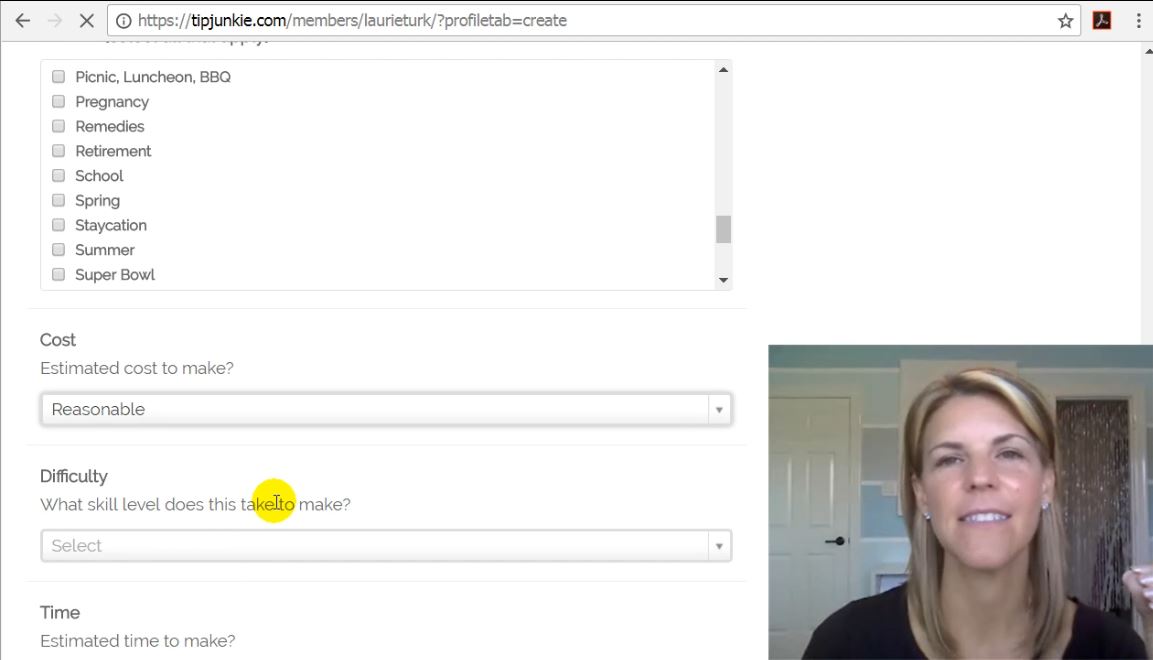
Step 14: Estimated Cost to Make
Since Tip Junkie is a DIY site which features tutorials this is an estimated cost to make.
- Absolutely Free = $0 – $25
- Cheap = Under $25
- Reasonable $25 = $50
- Steep = $50 – $100
- Expensive = Over $100
After making the video, I went ahead and changed the names of these fields to make things more specific and quality throughout the site as well as to better fit the space provided.
Step 15: Skill Level to Make
I have found that sometimes you want to find a tutorial to make using a skill level or difficulty level. So on Tip Junkie you can view projects via these categories as well.
- Kids Can Make
- Easy
- Moderate
- Very Difficult
It’s also nice that when you’re viewing a project you can see the estimated difficulty to know if you’ll be comfortable making it.
Step 16: Estimated Time to Make
Each project can also display the estimated time it will take to make. Here are the options.
- 30 Minutes
- 1-2 Hours
- 4 Hours
- Full Day
- Long Term
Step 17: Person
Who is this for? You can choose multiple people who might enjoy this project. I have found that sometimes I want to make a project for a specific type of person like my neighbor or grown up best friend. So here on Tip Junkie you can also view projects by Person {or recipient} as well as by Age.
Step 18: Age
Another great way to find projects is by age of the person or recipient. This way you can find something to make for specific age groups. You can choose multiple age groups which would enjoy this project. Please select all that apply.
Step 19: Terms of Use and Etiquette
Accepting the terms of use and etiquette is a mandatory field as I am legally bound by online laws and I have to get your permission to host your information. Granted, I wouldn’t have it any other way. {wink}
Step 20: Can I feature You?
The “OK to Feature” checkbox is an optional field. By checking this, you’ll automatically be put into my system to look over your project for review and possibly feature it on the home page and Tip Junkie’s social media channels.
This simply lets us know that you want to be promoted and you would like our help to get the word out about your amazing idea.
It is completely ok if you would prefer that we don’t promote your project. However, if it’s super fabulous then why not?!? {giggle} The Tip Junkie community is very kind and accepting we value creativity. So I hope you’ll check the box and allow me to do what I love most in the world and promote creative women just like yourself. {hugs}
Tips for Getting Featured: In order to keep Tip Junkie’s content educational and teach readers something cool, all projects featured will need to be a complete tutorial with a minimum of two steps in order to be featured.
In the past, I’ve tried to feature projects with only an image and a link to a blog post but that has not been successful. Since Tip Junkie readers are not bloggers, they get very confused and don’t see the point in me even trying to promote that format.
Already Blogged About It? If you’ve already blogged about this project, then simply change 30% of your blog post and upload it to Tip Junkie so I can increase your page rank and get you new readers. This way Google won’t see it as duplicate content. Of course it’s ok to link to your blog…. the best way is to link to another blog post that’s directly related to continue the journey of readers and adding value or insight to the topic and give them more.
Step 21: Publish
At this point, you can click “publish” or “save draft” buttons.
Publish ~ Will activate your project and put it live on the site to view.
Save Draft ~ Will keep your project in a private mode and only you can see it until it’s ready to be published.
Don’t over think things…. click publish. We are not professionals… we are creators, crafters, or DIYers. So it’s ok if your images aren’t Pinterest-worthy we don’t care. As Tip Junkie’s we value creative ideas above all. So click publish and let us see the great things that you’ve made. {giggle}
You’re Done!
Alrighty…. that’s all I’ve got for now. If I have missed something or if you still need clarification please leave a comment below. I would love to have the opportunity to address it as I’m sure others have the same question as well.
More TJCC Tips Coming Soon!
- Perk #1: Your Online Craft Room
- Perk #2: How to Update Your Profile
- Perk #3: How to Bookmark Ideas You Love
More Tips on how to use the Tip Junkie Creative Community {TJCC} will be rolling out over the next few weeks, so be on the look out! Thank you for being so wonderful and sticking with me as Tip Junkie grew by leaps and bounds and experienced some growing pains in the process. You ROCK!
What Questions Can I Answer for You?
Leave a comment or question below and I’ll make sure I add them to this tutorial as others probably are wondering the same thing. {knuckle bumps}
 |
Promoting creative women through their tutorials,
craft rooms, and products. .
~ Laurie {a.k.a. the Tip Junkie}
|
P.S. Join the conversations over on the Tip Junkie Facebook page. It’s a great place to ask questions on how to make things or for specific tutorials you need.







Leave a Reply