Get your pie love out and get ready to make some seriously AWESOME pie pops! You can do these with your kids and have an absolute BLAST putting them together with them! My family LOVE LOVE LOVE LERRRRVVZZZZZ these pops and they have become our new favorite pie-form-a-sheeone. Have fun and don’t forget to send me your feedback! I wanna feel your love :0).
Please note-I was having some trouble with Tip Junkie and my photos, so check out my blog for photos and more detailed instructions on this project @ www.bakerblissmaker.blogspot.com.
Pie Pop-a-LOOZA!
| Difficulty | Cost | Time | Age | Person | Event |
|---|---|---|---|---|---|
|
Easy
|
$25 to $50
|
1-2 Hours
|
-- | -- |
Homemade Gift
|
Inspired From:
You Will Need...
- 2" Scalloped Circle Cookie Cutter
- Baker Bliss Maker Mini Pie Pop Cut Outs (See Blog for Purchase)
- Lollipop Sticks
- Parchment Paper
- Press-N-Seal
- Apple Pie Filling
- Pumpkin Pie Custard Filling
- Pie Dough
Step by Step Instructions
Step 1
Pie pops are sooooooooooooo much fun! You can make them in any shape you want as long as there is a cookie cutter to cut the pie dough with, the possibilities are literally in a bazillions or as my kids call it, ka-zillions! You can make cute little cut outs in the center too, which also gives you even MORE fun options to jazz your pie pops up with. Center cut outs allow for venting & it just looks so adorable to have a teeny tiny heart or leaf or star or flower in the center of the pie pops to make it look extra sweet!

Step 2
Take your pie dough out of the fridge and let it rest for a bit to soften. I have found that the gluten-free dough needs a bit of time to soften before rolling or you will end up with a bunch of pieces of buttery, rice flower rocks all over your cutting board.

Step 3
Once is has softened, place the dough between two pieces of parchment paper. This step keeps your rolling pin, counter space, and hands free of the flour-ee mess and replaces it with a nice clean space and dough that has not been over floured or stuck to the counter like glue (yes…it happened to me ALOT…but not anymore :0). Cut out as many disks as can fit in the rolled pie dough.
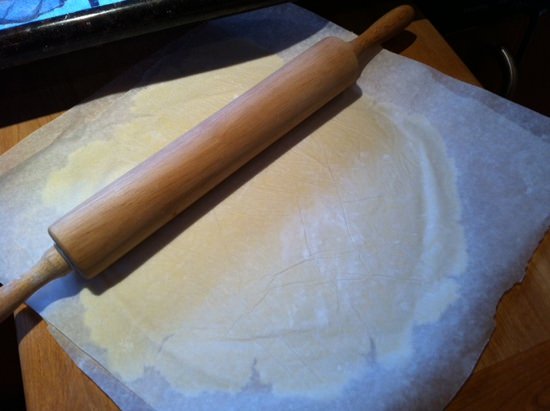
Step 4
Take your 2″ round scalloped circle cookie cutter and cut out as many disks as can fit with the rolled out pie dough.
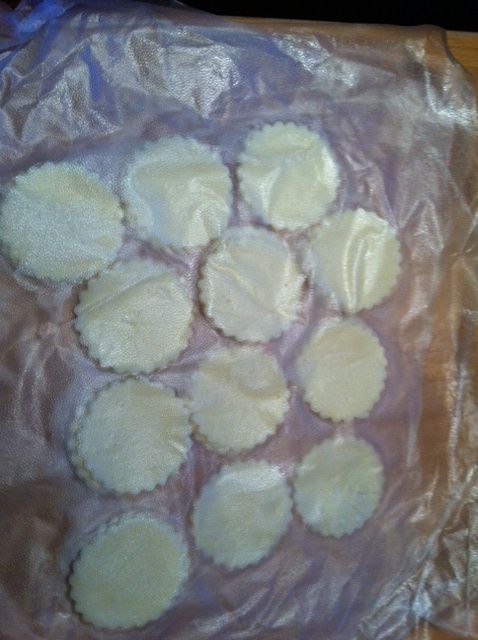
Step 5
**Pie Pop Helpful Hint – To help keep your pie pop baking extravaganza humming, take the disks you have cut out and place them on one sheet of Press N’ Seal and when it is full, place another sheet of Press N’ Seal over the disks and seal around the edges. This allows you to keep moving and keeps the pie dough from drying out and cracking, (which the gluten-free pie dough may do if left out too long). As soon as you are ready for the disks, simply peel away and line ’em up on your baking sheet and away you go!!

Step 6
Now that you have your disks ready, lay them on a parchment paper lined baking sheet. Once you have the disks down on the baking sheet, place the lollipop sticks about halfway inside the disk and press down until you have it firmly in place. Do not press too hard or you will press right through the dough and have to re-roll it again, which will toughen the dough up….ewwwwww!
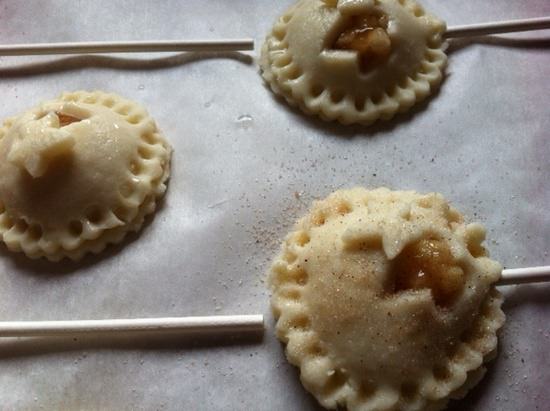
It’s filling time! I am showing you pumpkin and apple in this tutorial, but you can make pear, chocolate, pecan pie filling…again the possibilities are really endless! That’s the magic of baking for me is the freedom to make tons of new things in new flavors and special goodness desserts. Yummmm…..uhhhh…I digress….back to fillings….
OK, I put just about 1 Tbps of filling in each pie pop. Make sure it is right smack dab over the lollipop stick or you will end up with a sliding stick and the pie pop will slide right off and on to the floor…(ask me how I know)?!!?!

Step 7

Step 8
Once the top disk is on the pie pop, now it is time to seal the two pieces of dough together. There are several ways you can do this. My personal favorite way is to bend the end of one of the extra lollipop sticks and poke a divet around each space in the scallop. It keeps the look of the scalloped edge and gives a very good seal around the pie pop. You can also use your fingers to pinch the dough together like you would a traditional double pie crust or even use the end of a fork and seal the pie pop that way. The important thing is to make sure you have a solid seal around the edges and especially around the lollipop stick or you will have hot, steaming, flying saucer pie pops flinging themselves all around you when you go to put them on the cooling rack (ask me how I know..).
Step 9
I would LOVE to hear what you think! I see TONS of hits on my blog and other social networking sites, but nobody is leaving me any love! Please let me know if you try my project what you thought because I love my bajillion views, but with no response, how am I gonna feel your love? Especially if your tummy is full of pie pops, pies in a jar, or gluten-free pie goodness!
**Also, I apologize for any glitches in this tutorial. Tip Junkie and my MacBook are waging war on one another and I am currently in the process of figuring out why it takes me over 2 hours to post and re-post steps before they will stick! So, my apologies fellow Tip Junkians and please don’t forget to send me some love or I may just have to start my own Pie Pop-a-Looza-Non for dejected pie bakers…
Gallery

I apologize for only seeing the 10th step to this project. I am having MAJOR technical difficulties posting my projects. I am going back again and trying to fix it. Please go to my blog and see the full project in action and PLEASE send me some love and let me know what you think about them! Send me pictures too!