The following is a basic quilt tutorial that will help you practice your straight line stitching {the basis for almost all sewing} and end up with a beautiful keepsake or gift. Don’t shy away when I use the word quilt okay? Quilting can draw up images of intricate designs and complex patterns. But it doesn’t have to. A quilt is nothing more than two layers of fabric with a layer of batting in between ‘quilted’ to hold all of it together. This tutorial, while maybe not ‘technically accurate’ for a veteran quilter will show you how easy {and fun} quilting can be!

In May/June I guest posted a three part series, How to Sew, here at Tip Junkie. I finished off the series teaching you the basic straight stitch and I thought it would be fun to encourage the new {or even seasoned} sewer to apply what they learned into a ‘real life’ project.
Quilt Tutorial

Basic {Simple Straights Square} Quilt Tutorial {by Knitty Bitties}
Finished size: 40″x40″

Materials Needed for a Basic Quilt
{4} 1/2 YD cuts of coordinating fabrics (Quilt Top/Front)
{1} 1 1/4 YD cut of a coordinating fabric (Quilt Back/Bottom)
{1} Batting {Warm&Natural} Piece 45″x45″
Coordinating thread {Gutermann’s All Purpose thread in natural}
Square Up Your Fabrics
Step 1.
Square up your fabrics before you beginning cutting strips. The best way to do this {I find} is to hold it in front of you and bring the two selvedge {finished} edges together horizontally so that you have a nice smooth rectangle of fabric. Press your fabric piece. Now bring the folded edge up to the selvedge edges. You now have 4 layers of fabric which should lay flat and smooth. Using your ruler and cutting mat, square up one of the raw edges and remove the excess fabric with your rotary cutter. Repeat for all remaining cuts of fabric.

Cut Strips
Step 2.
Cut strips of fabric for your quilt top. You will need to cut as follows::
Front Fabrics –
Fabric 1 & 4 – 5″ / 5″ / 2.5″ / 2.5″
Fabric 2 – 4″ / 4″ / 3.5″ / 3.5″
Fabric 3 – 3″ / 3″ / 3″
All cuts are the full width of the fabric {selvedge to selvedge} by the above measurement.

Stack Strips In Order
Step 3.
Determine the layout you’d like for your strips. Move them around until you’re happy with their placement and the variation of the patterns. Then, stack the strips in order with the top/beginning strip on the top of the pile.

Sew Strips Together
Step 4a.
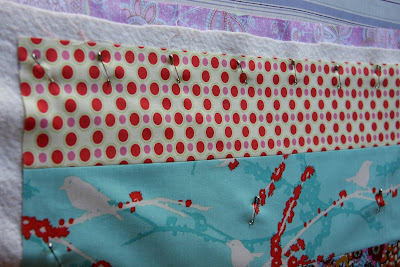
Sew the strips together. Take the first strip and lay it out right side up. {You’ll notice one selvedge edge usually has the pattern on it and the other edge has fabric/printing information. I like to keep the ends with the pattern all lined up on the left side.} Take the next strip and lay it right side down, matching up the selvedge edge on the left and the raw edge on the bottom. Pin fabric together {I like to pin about 1″ from the edge so that I don’t have to remove my pins while I sew}. You will sew from the ‘top’ {shown in the photo} to the bottom. Using a 1/4 seam allowance (SA) sew the two pieces together with a small stitch length of 2.2-2.5. Back stitch at the beginning and ending of each seam. Press seam OPEN using steam to get a nice flat seam.

Step 4b. Similar to step 4a, lay out your now pieced together strip right side up. Take the next strip and lay it right side down, again matching up the selvedge edge on the left and the raw edges along the bottom. Pin the fabric together. This time you will sew from the bottom to the top. {The reason for this is that by switching directions, you’re less likely to get a ‘curve’ to your strips and will end up with a more square quilt top.} Press seams open.
Repeat Steps 4a & 4b for remaining strips, remembering to alternate your direction of sewing.
Hurray, you’ve just made you’re self a quilt top! Pat yourself on the back, stretch, go grab a chocolate and come back refreshed and ready to finish your quilt.

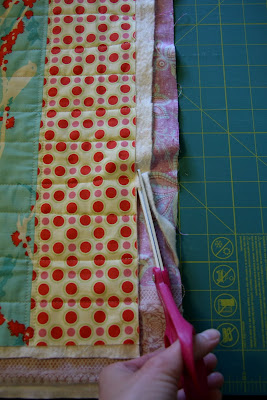
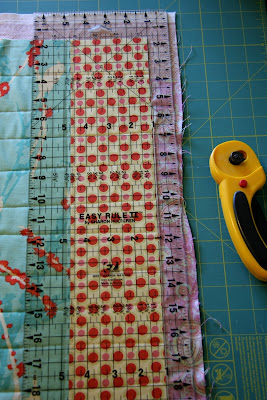
Trim Your Quilt Top
Step 5.
Time to trim up your quilt top. We want to end up with a 40″ square quilt top. Lay one of your selvedge edges on your cutting mat and line your ruler up with the most inset selvedge edge {they may be varying lengths so you have to go with the shortest to get a straight edge}. Trim excess {see photo}. You’ll have to adjust your quilt top several times on your cutting mat to trim the full length. From this clean cut edge, measure 40″ and make a mark. Trim the opposite side using this mark {or several marks if you’d like} as your guide. You just cleaned and squared up the side to side portion of your quilt top. Now you need to turn it and measure the top to bottom to see if they need trimmed. If so, make a mark just like in the you did for the sides and trim at 40″.

Prepare Quilt Your Backing
Step 6.
Preparing your backing. I designed this tutorial to use a single cut of fabric for the backing. Most quilting cottons are anywhere from 42-45″ in width. Because we are going to do a ‘cheater binding’ which borrows fabric from the back piece, we need it to be at least 1.5-2″ wider than the front piece on all sides. {I made an error in calculation with my quilt and didn’t get quite enough for my backing. So, I had to piece together a few more strips of fabric to make it large enough. This is fine too, just another added step I was trying to avoid.}

Make A Quilt Sandwich
Step 7.
Making your quilt ‘sandwich.’ Your sandwich is: your quilt back right side down, batting and then your quilt top right side up. There are several good tutorials on how to do this in greater detail. The larger your quilt the more accurate you need to be. Because this is a small quilt {and because I didn’t want to clean my floors} I am sandwiching my quilt on my ironing board table. Start with your quilt top down, then layer on your batting and then place your quilt top, making sure you have at least a 1.5″ border of the backing showing all around. {To make it easier to see my backing, I cut my batting 41″x41″ so that it was bigger than the front piece, but smaller than the back.}
Iron & Pin Into Place
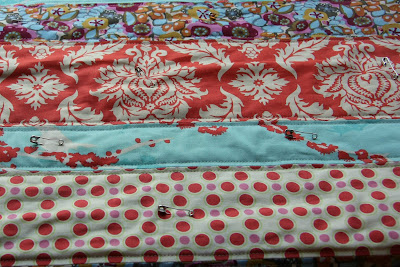
Iron all three layers and begin to pin in place using quilting pins {they look like curved safety pins}. Along the top edge I placed them every 3 inches so I could use them as guides later when I quilted, but every 6 inches on the rows after that. Carefully shift all three layers on the ironing board and smooth everything out, iron and pin. Make sure you keep checking you have a 1.5″-2″ border of your back fabric.
Time To Quilt!
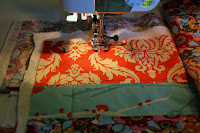
Step 8a.
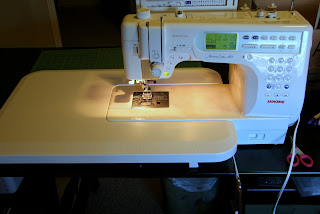
Let’s quilt! We’re going to do straight line quilting which is really no different than the way you sewed your strips together EXCEPT you’ll want to use a much longer stitch length {about 3.5} and you might need to tighten your tension a bit {I tighten mine by 1 on my machine}. Also, you will want to use a ‘walking foot.’ A walking foot provides ‘feed dogs’ on top to help pull all layers through at the same rate. They make a walking foot for most machines, but it doesn’t always come standard. A quick search should give you an online resource. If your machine came with an extension table now would be the time to use that as well {not necessary, but it will make things easier.}

Quilt On Each Side Of Seams
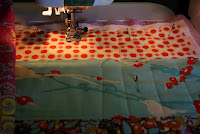
We’re going to first quilt on each side of the seams you sewed earlier when you sewed the strips together. Start by lining up your needle so that it is approx. 1/4″ to the right of your first seam. Back stitch at the beginning and end of each row. Stitch the whole width of the quilt, but DO NOT go past your quilt top. When you get to the end, sink your needle down, lift your foot and rotate your quilt so that you can stitch on the other side of the seam. Put your foot down, lift your needle and adjust so that again you’re stitching 1/4″ to the right of the seam. Continue stitching the rest of the quilt like this. I never cut threads until the very end, you should be able to just keep moving your quilt and lining up on the next seam.

You will notice that as you go back and forth, you’ll need to ‘roll’ your quilt sides to more easily manage it.
** On of the best tips on quilting is to not let your quilt weight ‘drag’ down your stitching. Try to keep it from pulling by keeping it on your lap or on your sewing table and not hanging off the side creating pull and drag. **
Quilt Vertical Lines {optional}
Step 8b.
Good work, your horizontal quilting is done. Now, you could stop here, but to create a little more texture, I quilted vertical lines as well. Now you could be as precise with these as you were with your horizontal lines, but I think it’s fun to mix it up with ‘wonky’ {i.e. not perfectly spaced or straight} lines.
I used the safety pins at the top of my quilt as my rough guides. My idea was to stitch 2 lines between each safety pin. Line up your needle in between 2 safety pins. Just like in step 9a. quilt to the end of the quilt and then pivot, shift your quilt and quilt back up to the top. I spaced my lines approx. 1-1.5″ apart but didn’t worry too much about making them exact or keeping them perfectly straight.
Continue on until all your vertical quilting is done. Iron the entire quilt. Trim all your threads.
** You will most likely run out of your bobbin thread a couple times during the quilting process. When this happens, simply snip the top thread and bottom thread, remove your quilt, reload your bobbin and get back to your ending spot. Go over a few of your stitches and make sure to back stitch before you continue quilting. **
Trim The Batting
Step 9.
Trim the batting. Carefully go around the quilt and trim off JUST the batting. Be careful not to cut through the front or back of the quilt.
Step 10.
Trim the backing. You want to have a perfect 1″ border of your backing fabric all the way around your quilt. Using your ruler and rotarty cutter, trim the backing to 1″ from the quilt top edge.


Step 11.
Cheater binding. I’m using the method I learned from Made by Rae’s tutorial. I have used this technique for my mug rugs, but wanted to try it on an actual quilt. It worked beautifully. I gave a quick visual guide above, but you can read Rae’s full tutorial and this post of mine for some helpful tips. Use quilt binding clips {which look like hair clips} to hold your binding in place. Stitch binding down using a 2.5 stitch length and stitching as close to the edge of the binding as you feel comfortable. When you get to a corner, sink your needle down and pivot your quilt and continue on the next side until you’re back to your starting point.
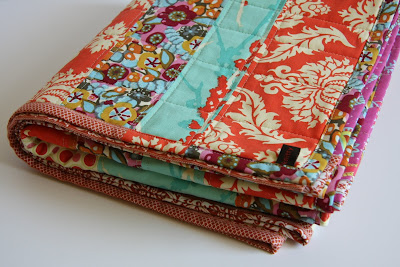
TA-DA! Snip your thread and you’ve got yourself a beautiful handmade quilt!
How to Sew Series:
- Step 1: How To Thread a Sewing Machine {step-by-step}
- Step 2: The Needle and Thread Guide {all you need to know}
- Step 3: How To Use A Sewing Machine {fabric mug rug}
- Step 4: How To Make A Pillow Sham or Cover {sewing pattern}
- Step 5: How to Sew A Basic Quilt Tutorial
P.S. Join the conversations over on the Tip Junkie Facebook page. It’s a great place to ask questions on how to make things or for specific tutorials you need.
 |
Promoting creative women through their tutorials,
craft rooms, and products. .
~ Laurie {a.k.a. the Tip Junkie}
|

I tweeted @ FLBUTTERFLYMAMA80
I tweeted about the giveaway!
I’d make my 1st quilt!
I would love to win the fabric to “try” to make the quilt, i can not sew, cut, draw or even walk a straight line, but i want to learn to sew so bad. please help me out! thank you!
i’d make a quilt of course!! 🙂