First–Thank you to everyone who added their input in the comments section of last week’s Blogging 101 post! It was fun to read so many thoughts about what makes a great blog. Now let’s get to this week’s question!
This weeks question:
Q: How do I add a favicon to my blogger blog?
A: Let’s first take a look at what a favicon is! A favicon is like a logo–it’s the little image that shows up next to a website’s address. On blogger, you’ll see the orange and white “B”.
So let’s take a look at how to change your blog’s favicon to something more fun. It’s truly a great way to make your blog standout!
Step 1:
First we need to create a small image that we can turn into a favicon. To do this, youll need some sort of editing program. If you dont have a purchased program such as Photoshop, there are many free options that will work great for our purposes! My personal favorite is Gimp, but you can use anything from Picnik to your basic Paint program.
The image you create needs to be 15X15 pixels. Keep in mind that this is very small, so consider creating something simple!
Step 2:
Once youve created an image that youre happy with, save it to your computer as either a .jpg, .png, or .gif file.
Step 3:
After you’ve saved your image, we need to find a favicon generator on the web. I suggest going to http://iconj.com/.
Step 4:
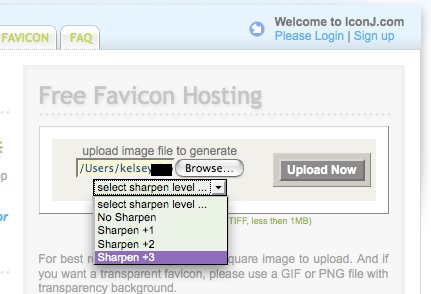
Once there, find where it says “Free Favicon Hosting”. Click on “Browse” to find and select the image you just saved to your computer. After you’ve selected your image, select a sharpen level of “Sharpen +3” as I’ve shown here in purple.
Step 4:
Once you’ve selected the sharpen level, click on “Upload Now”. You will then see a page that says you’ve uploaded your image successfully. On this page, highlight and copy the link from the “Direct Link” section.
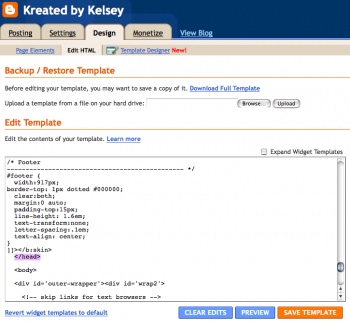
Go to your blogger dashboard and select “Design”.
 Under the design tab, select “Edit HTML”.
*NOTE: I would strongly recommend backing up your template before completing the next steps!*
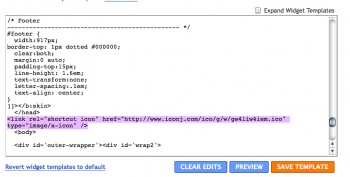
Once in your HTML section, search the page for the following: </head>
Place the code you copied from the favicon site directly after the </head> code you just searched for.
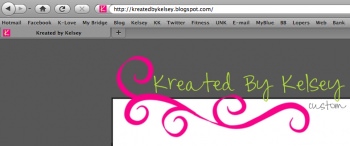
Save your template and then take a look at your blog. If your favicon doesn’t show up right away, try refreshing the page. Now instead of the standard logo, your blog should have a cute favicon of it’s own!
Keep in mind that while favicons show up in most browsers, they will not appear in all of them. Good luck everyone!
Do you have a question you want me to answer? Leave a comment! 🙂


Woot! I’ve been wanting to do this. Thanks for the great tutorial. I’ve now got a great little favicon!
Carolina
Awesome! I just did a favicon for my blog and it turned out great! The directions were so easy to follow! Thank you bunches!
I used picnik to resize my image and I used the recommended FavIcon Labs website to create a free favicon.
Great tip! Much appreciated!
Kara @ Mine for the Making
awesome! Thanks so much! I actually was able to do it {right} on the 1st try!! Tip Junkie, you are awesome!
Didn’t even realize such customization was possible – wow! Thanks for the simple instructions!
Hi! This is great, but do you know if it works with the Firefox browser? I followed your directions, but it is not showing up. Such a cute idea too!! =)